BASIC SKILLS – PENCIL DRAWING TECHNIQUES BY JURITA ART©
.")
Content:
1 Project Description
1.1 The purpose of the lesson
1.2 Who is this course for
1.3 Materials
1.4 What will you learn
1.5 Course outline
1.6 Share your work
1.7 About the artist
2 Pencil drawing techniques
2.1 Hand position: How to best hold pencils
2.2 Which pencil should I use for drawing?
2.3 Change line thickness
2.4 Shading techniques
2.5 Do not stain the surface
2.6 Work from left to right
2.7 Drawings in the blind
2.8 Start with preparatory drawing
2.9 Check the overall impact of your work
3 Using the right tools
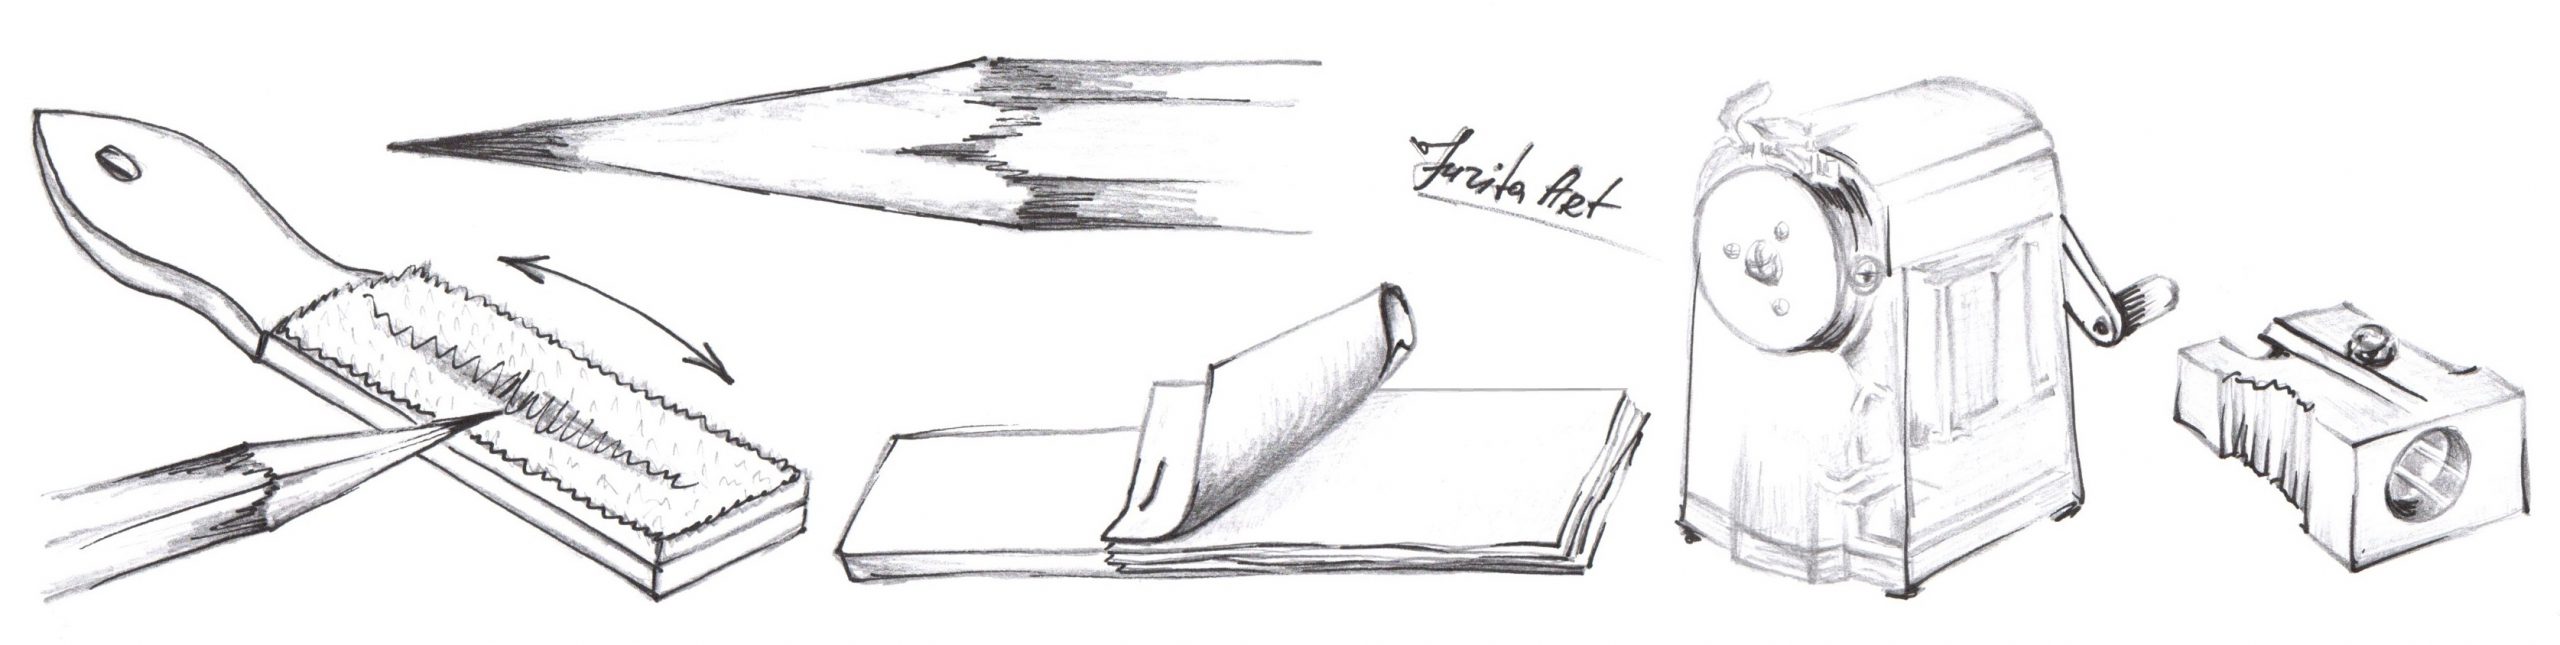
3.1 How to sharpen pencils correctly
3.2 Adjust your work
3.3 Explore different paper textures
3.4 Transfer character
3.5 Combine your colors
3.6 Try combining pencils with watercolors
3.7 Use your own experience
3.8 Get out of your comfort zone
3.9 Use opposing concepts
4 Practical tasks
4.1 Questions, exercises and creative tasks
4.2 Drawing Still Life (pencil)
4.3 Drawing the drapery (pencil)
4.4 Drawing a jug (pencil)
1 Your class project
Draw a drawing of a still life with a simple pencil.
1.2 Who this course is for
This drawing course is ideal for anyone who wishes to learn how to draw fast in 1 lesson all the fundamentals are covered here, the techniques you need to draw with confidence.
Have you ever wanted to learn to Draw? Maybe, you used to sketch a long time ago and now want to rebuild your skills? If you answered YES to any of these questions – join me to learn the foundation drawing skills needed to become a better painter!
This course may NOT be suitable for someone already versed in traditional sketching skills, or someone who has an art degree.
1.3 What you’ll need:
- Drawing paper.
- Several simple pencils of varying degrees of softness.
- Eraser.
- Your pencil sharpener.
- Drawing board and masking tape.
1.4 What you’ll learn:
- The best ways to hold your pencils.
- Shading techniques.
- Blind contour drawing.
- How to sketch complicated object using simple shapes.
- How to use sketching as a means of communication.
- This course also contains practical exercises and demonstration lectures.
1.5 Course Summary:
BASIC SKILLS / Pencil drawing techniques is a self paced course. My courses offers some of the clearest, most accessible drawing instruction available. This course starts right at the beginning:
- Pencil drawing techniques.
- Use the right tools.
- Advanced tips.
- Practice.
This courses focuses on using traditional materials, pencil and paper. You can get started Drawing with any drawing materials you have around the house. The program is simple, you’ll watch one video lesson that will introduce an essential drawing skill, and then do the practice. Many of the tools and techniques you’ll learn here are rarely seen outside of private art academies. Many useful tips for beginners and intermediate artists. A lot of interesting theory on composition, chiaroscuro, etc. I’ll also offer advice on the tools and materials you need to know, such as paper options, and different erasers.
These pencil drawing techniques from establish artist Jurita will help you take your drawing skills to the next level.
BASIC SKILLS is the first course in Drawing & Painting series designed to take students from the basics to advanced drawing techniques like perspective drawing and shading. If you’re a beginner, we recommend going through the entire series in the following order:
- BASIC SKILLS / Pencil drawing techniques
- FORM & PERSPECTIVE / 3D Figure drawing techniques

1.6 Sharing Your Work:
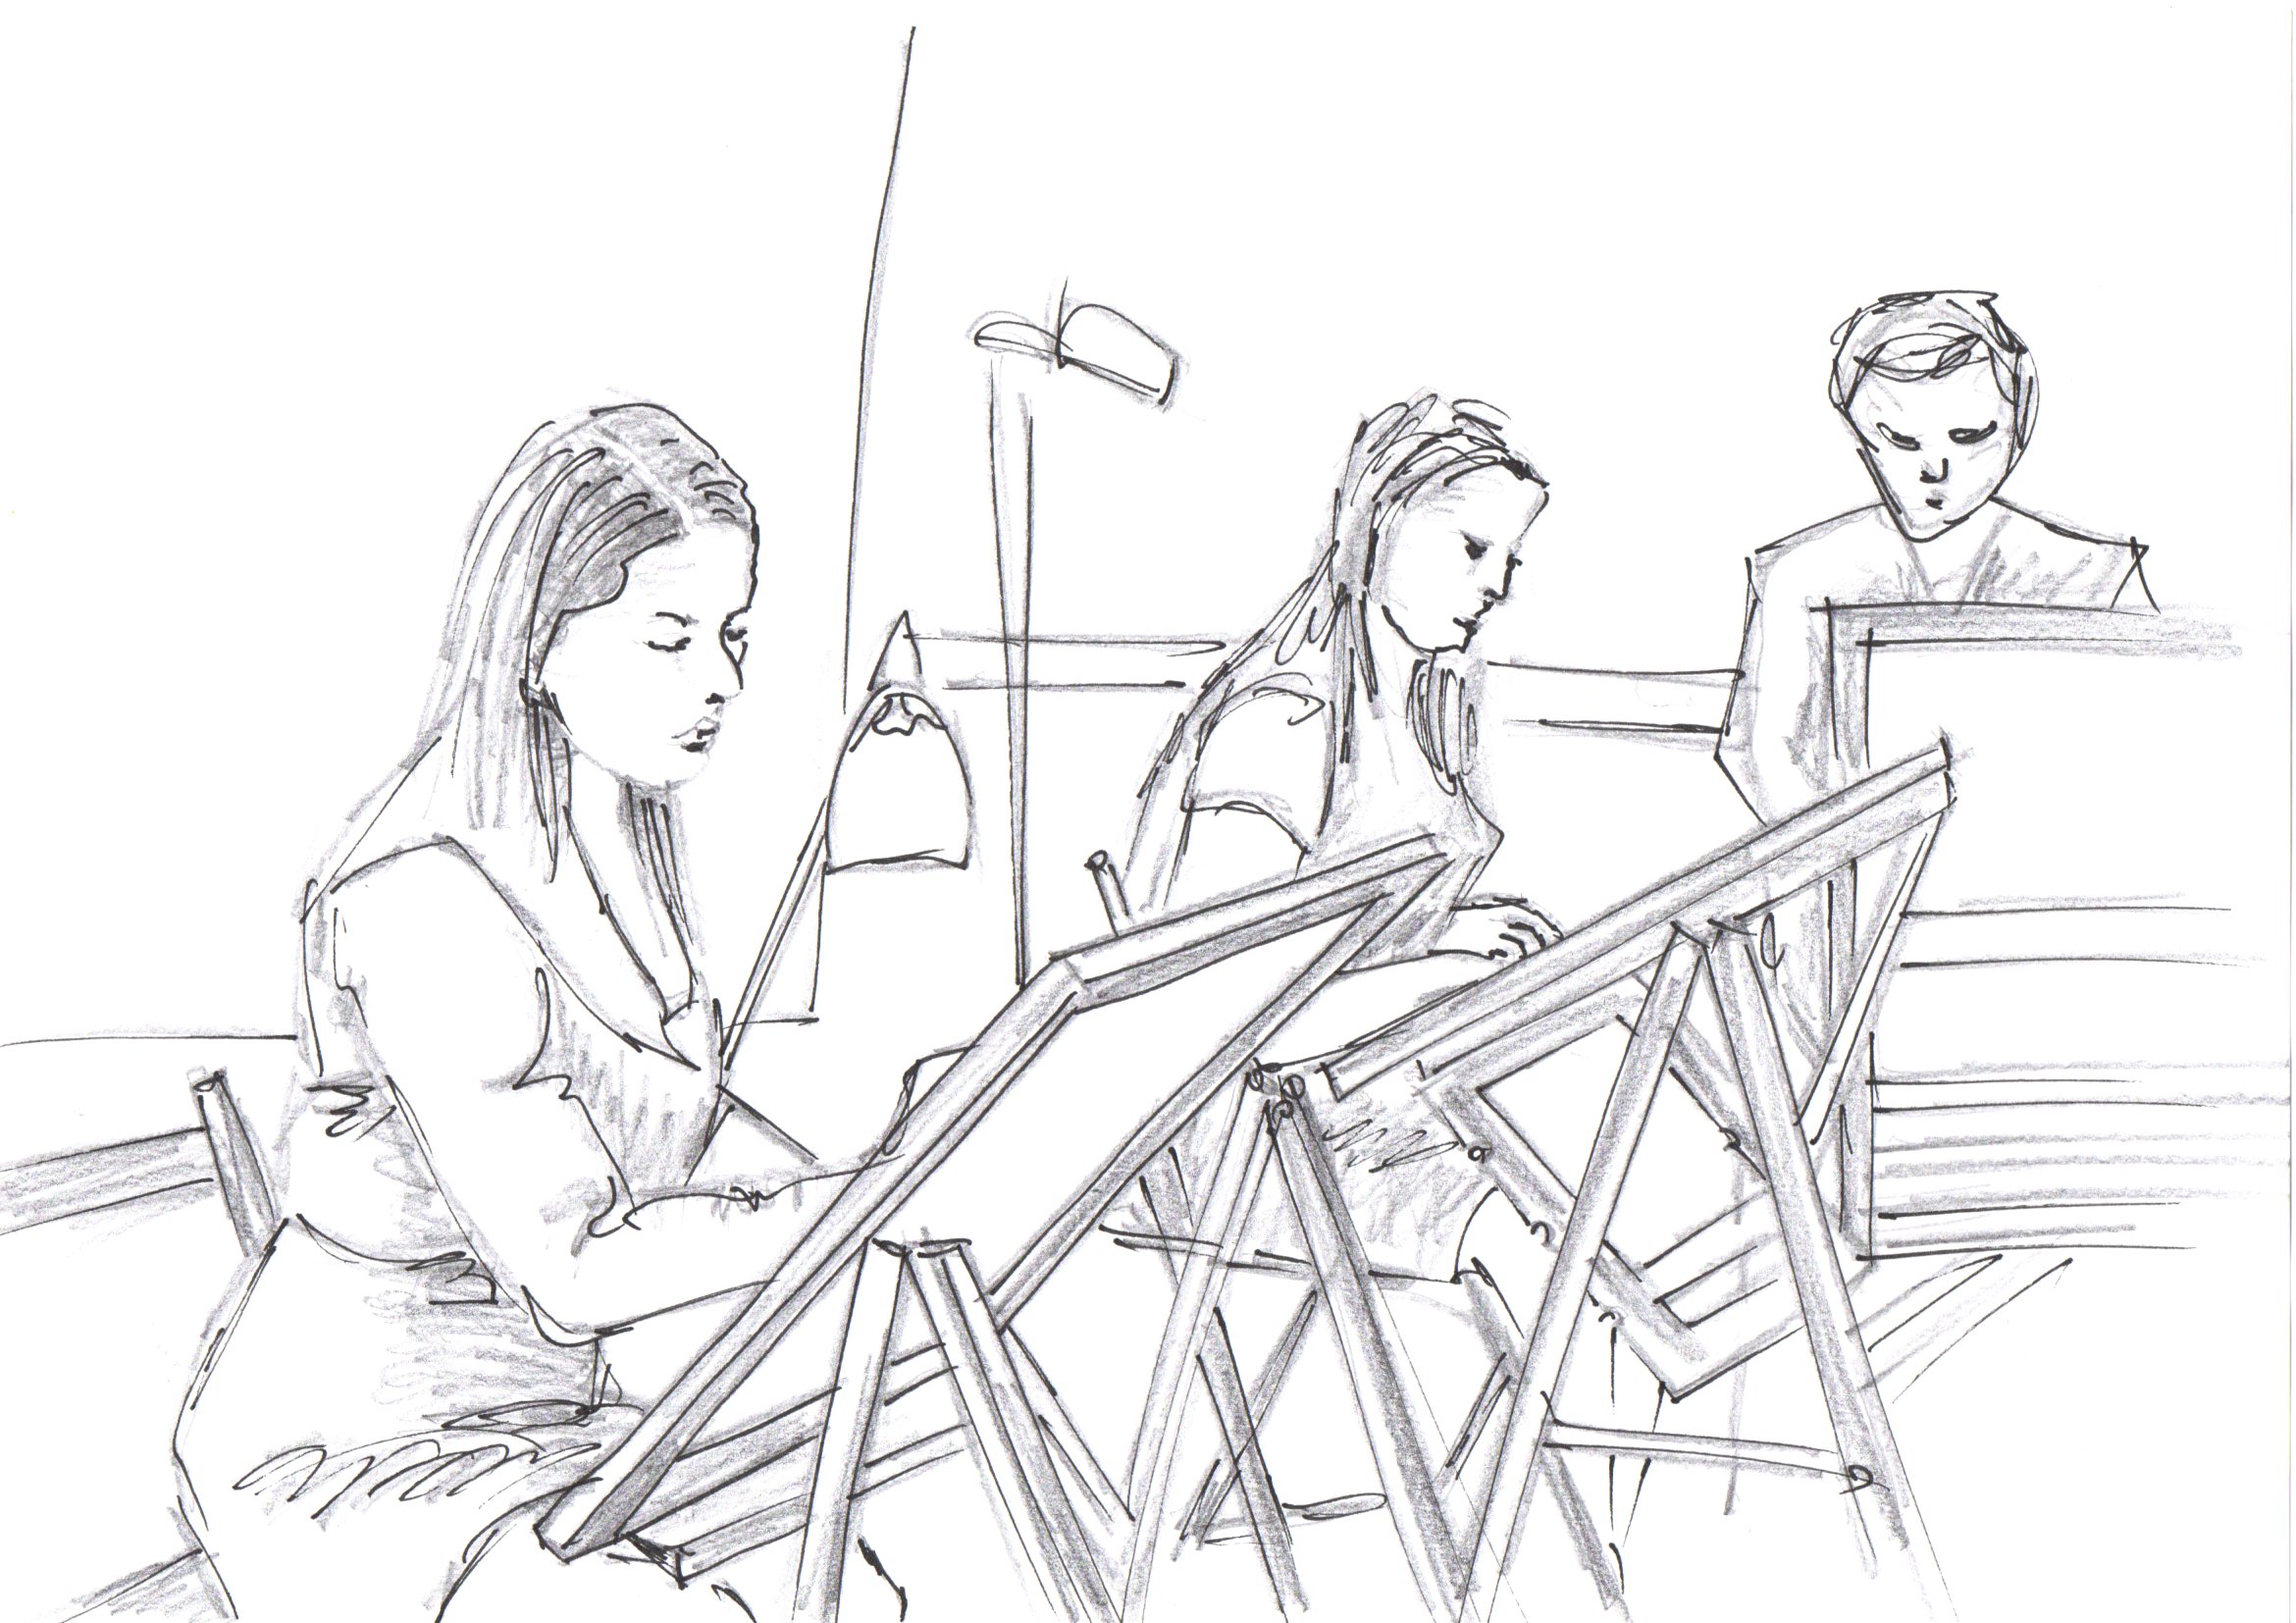
Share your final illustration and progress shots with the class by uploading to the “Your Project” section. If you have any questions or need more tips, please let me know! I’m happy to help! Here’s an example of a cartoon face from my class!
1.7 About artist:
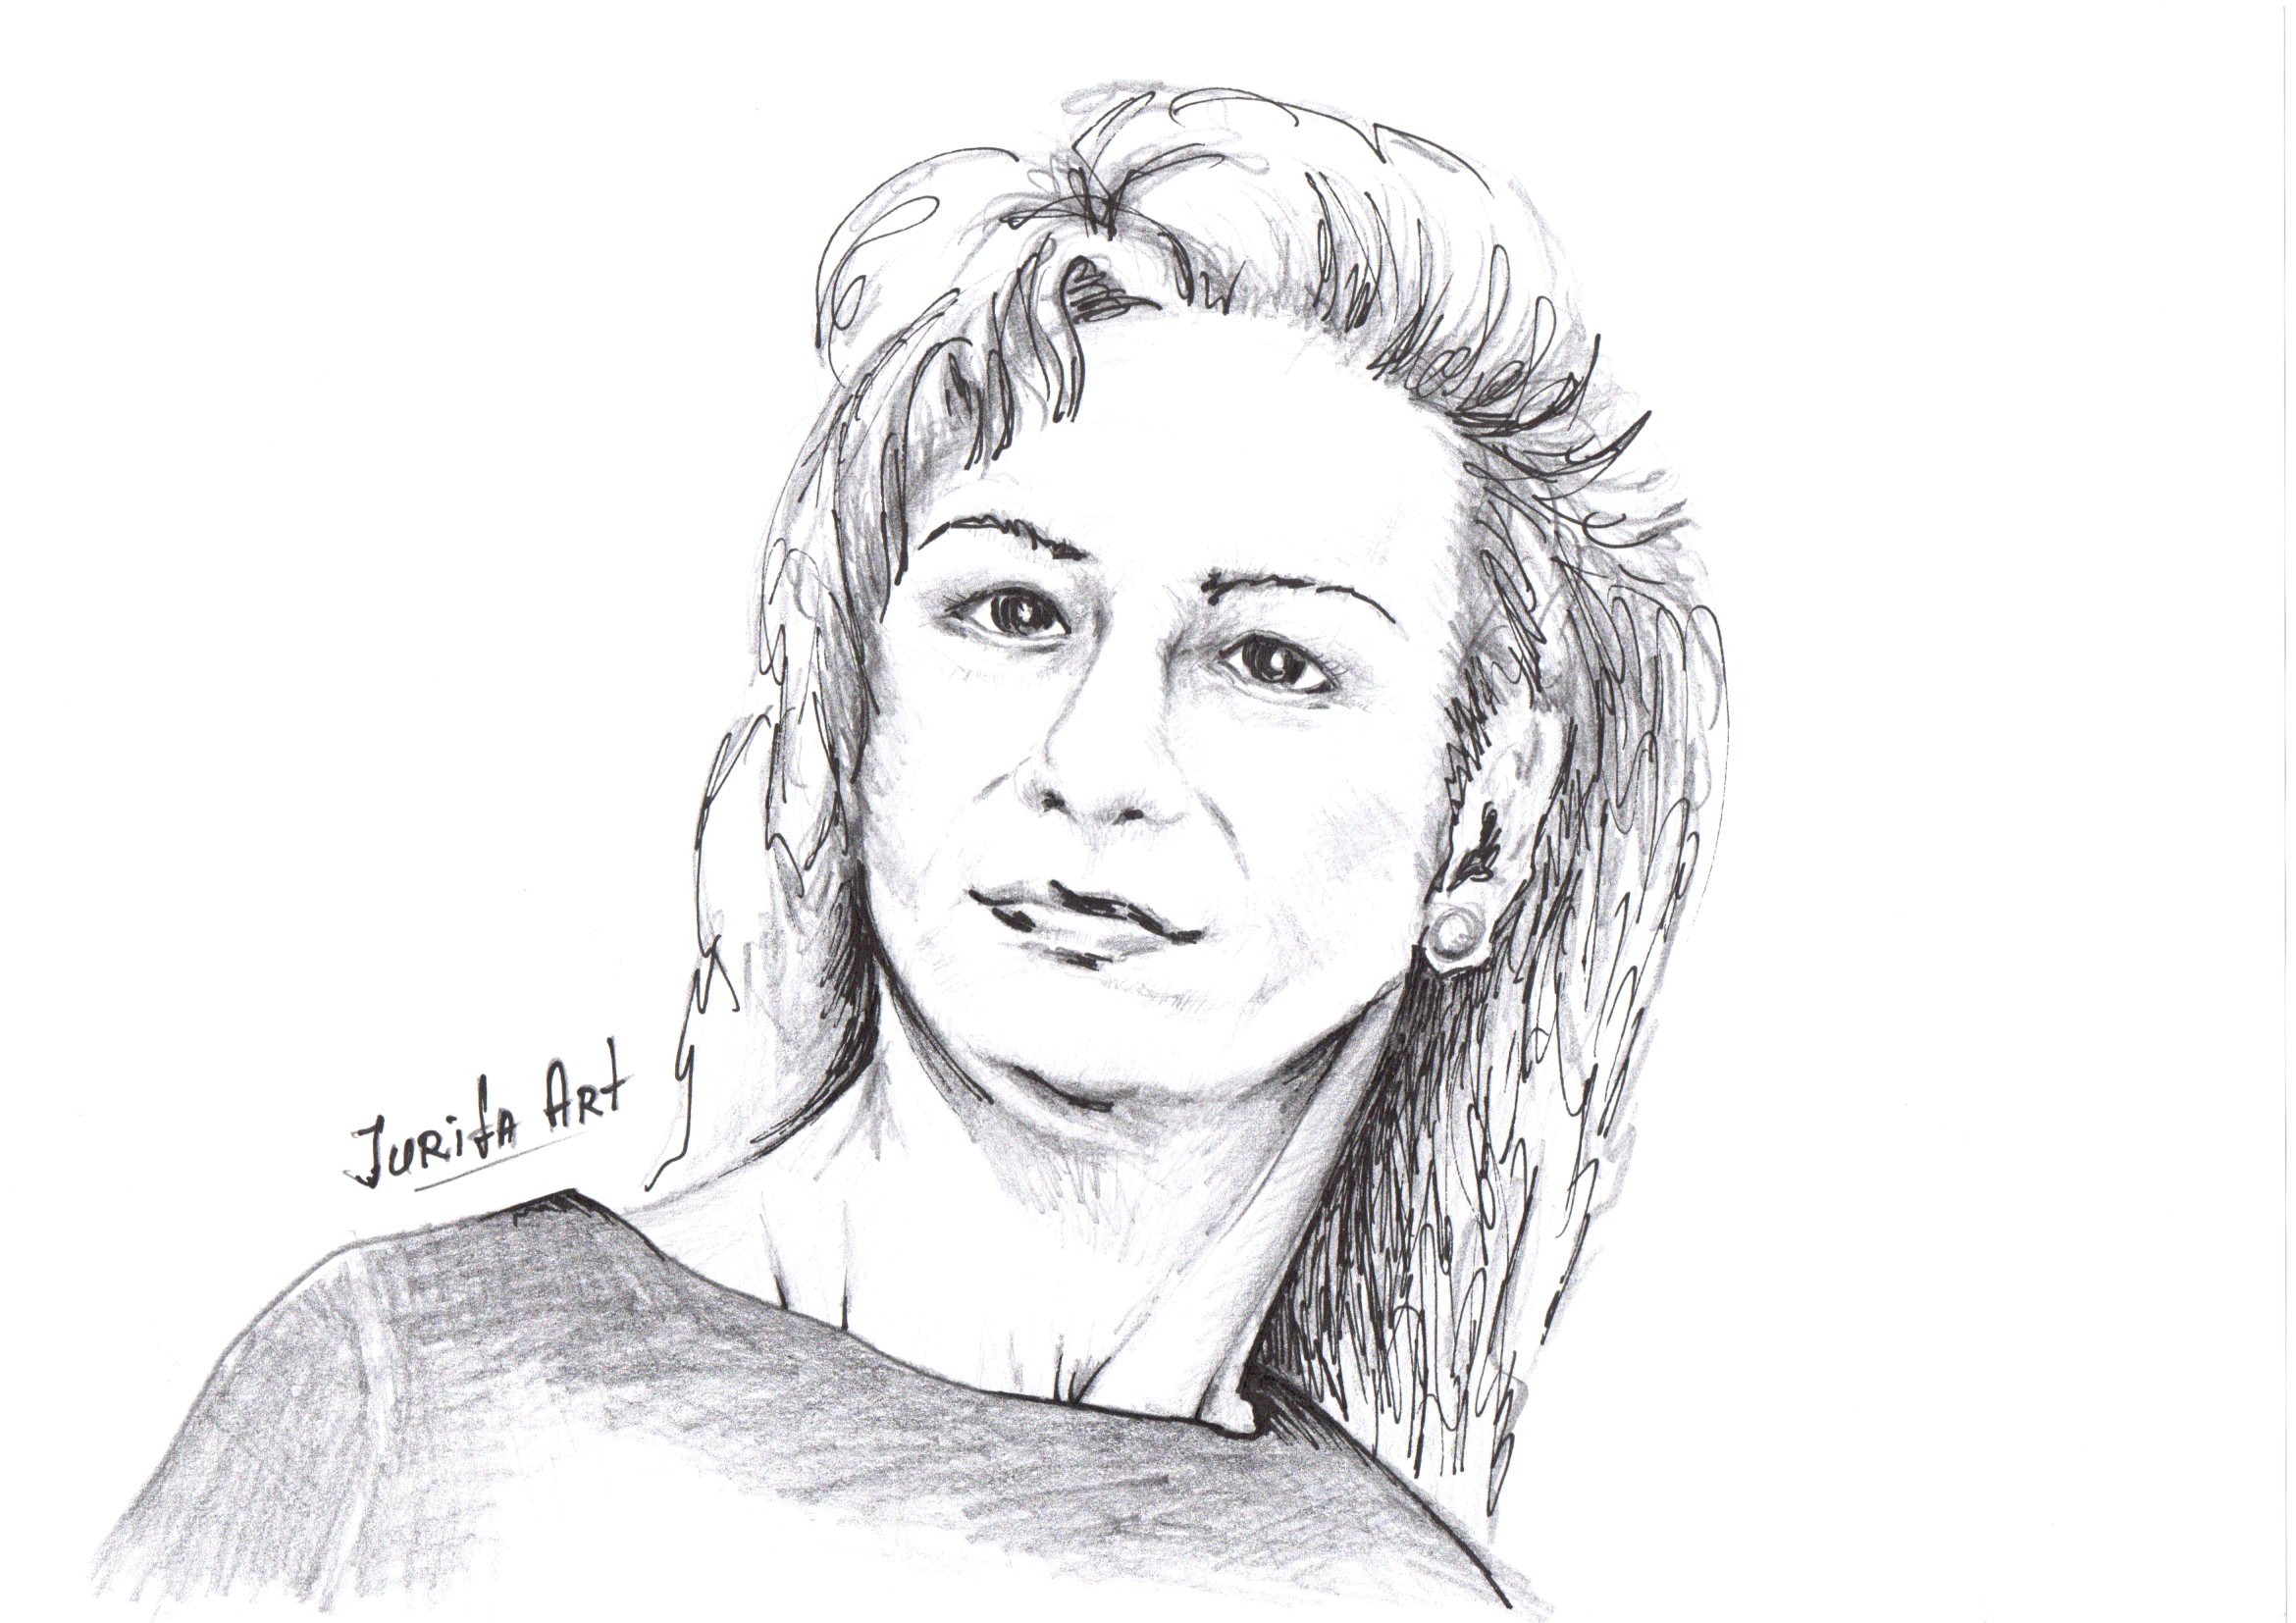
My name is Jurita AGSA and I will be your drawing instructor. Drawing has become my lifelong passion after i working as web designer for over 20 years.
After studying at Tel-Aviv University and courses of Art & Design in London, I have continued to study numerous forms of drawing including the timeless traditions of the old masters in private art classes of famous french/british/russian famous artists.
I have teaches art class for over few years at many different levels for beginners who enjoy recreational drawing and love working with students from more than 150 countries. I’m thrilled to bring you a lifetime of drawing and teaching experience in this unique program. I look forward to working with you as you complete program.
2.3 Vary line thickness
Varied line thickness can help add depth to a drawing. Varying the thickness of the line you use help guide your viewer through your drawing.
2 Pencil drawing techniques
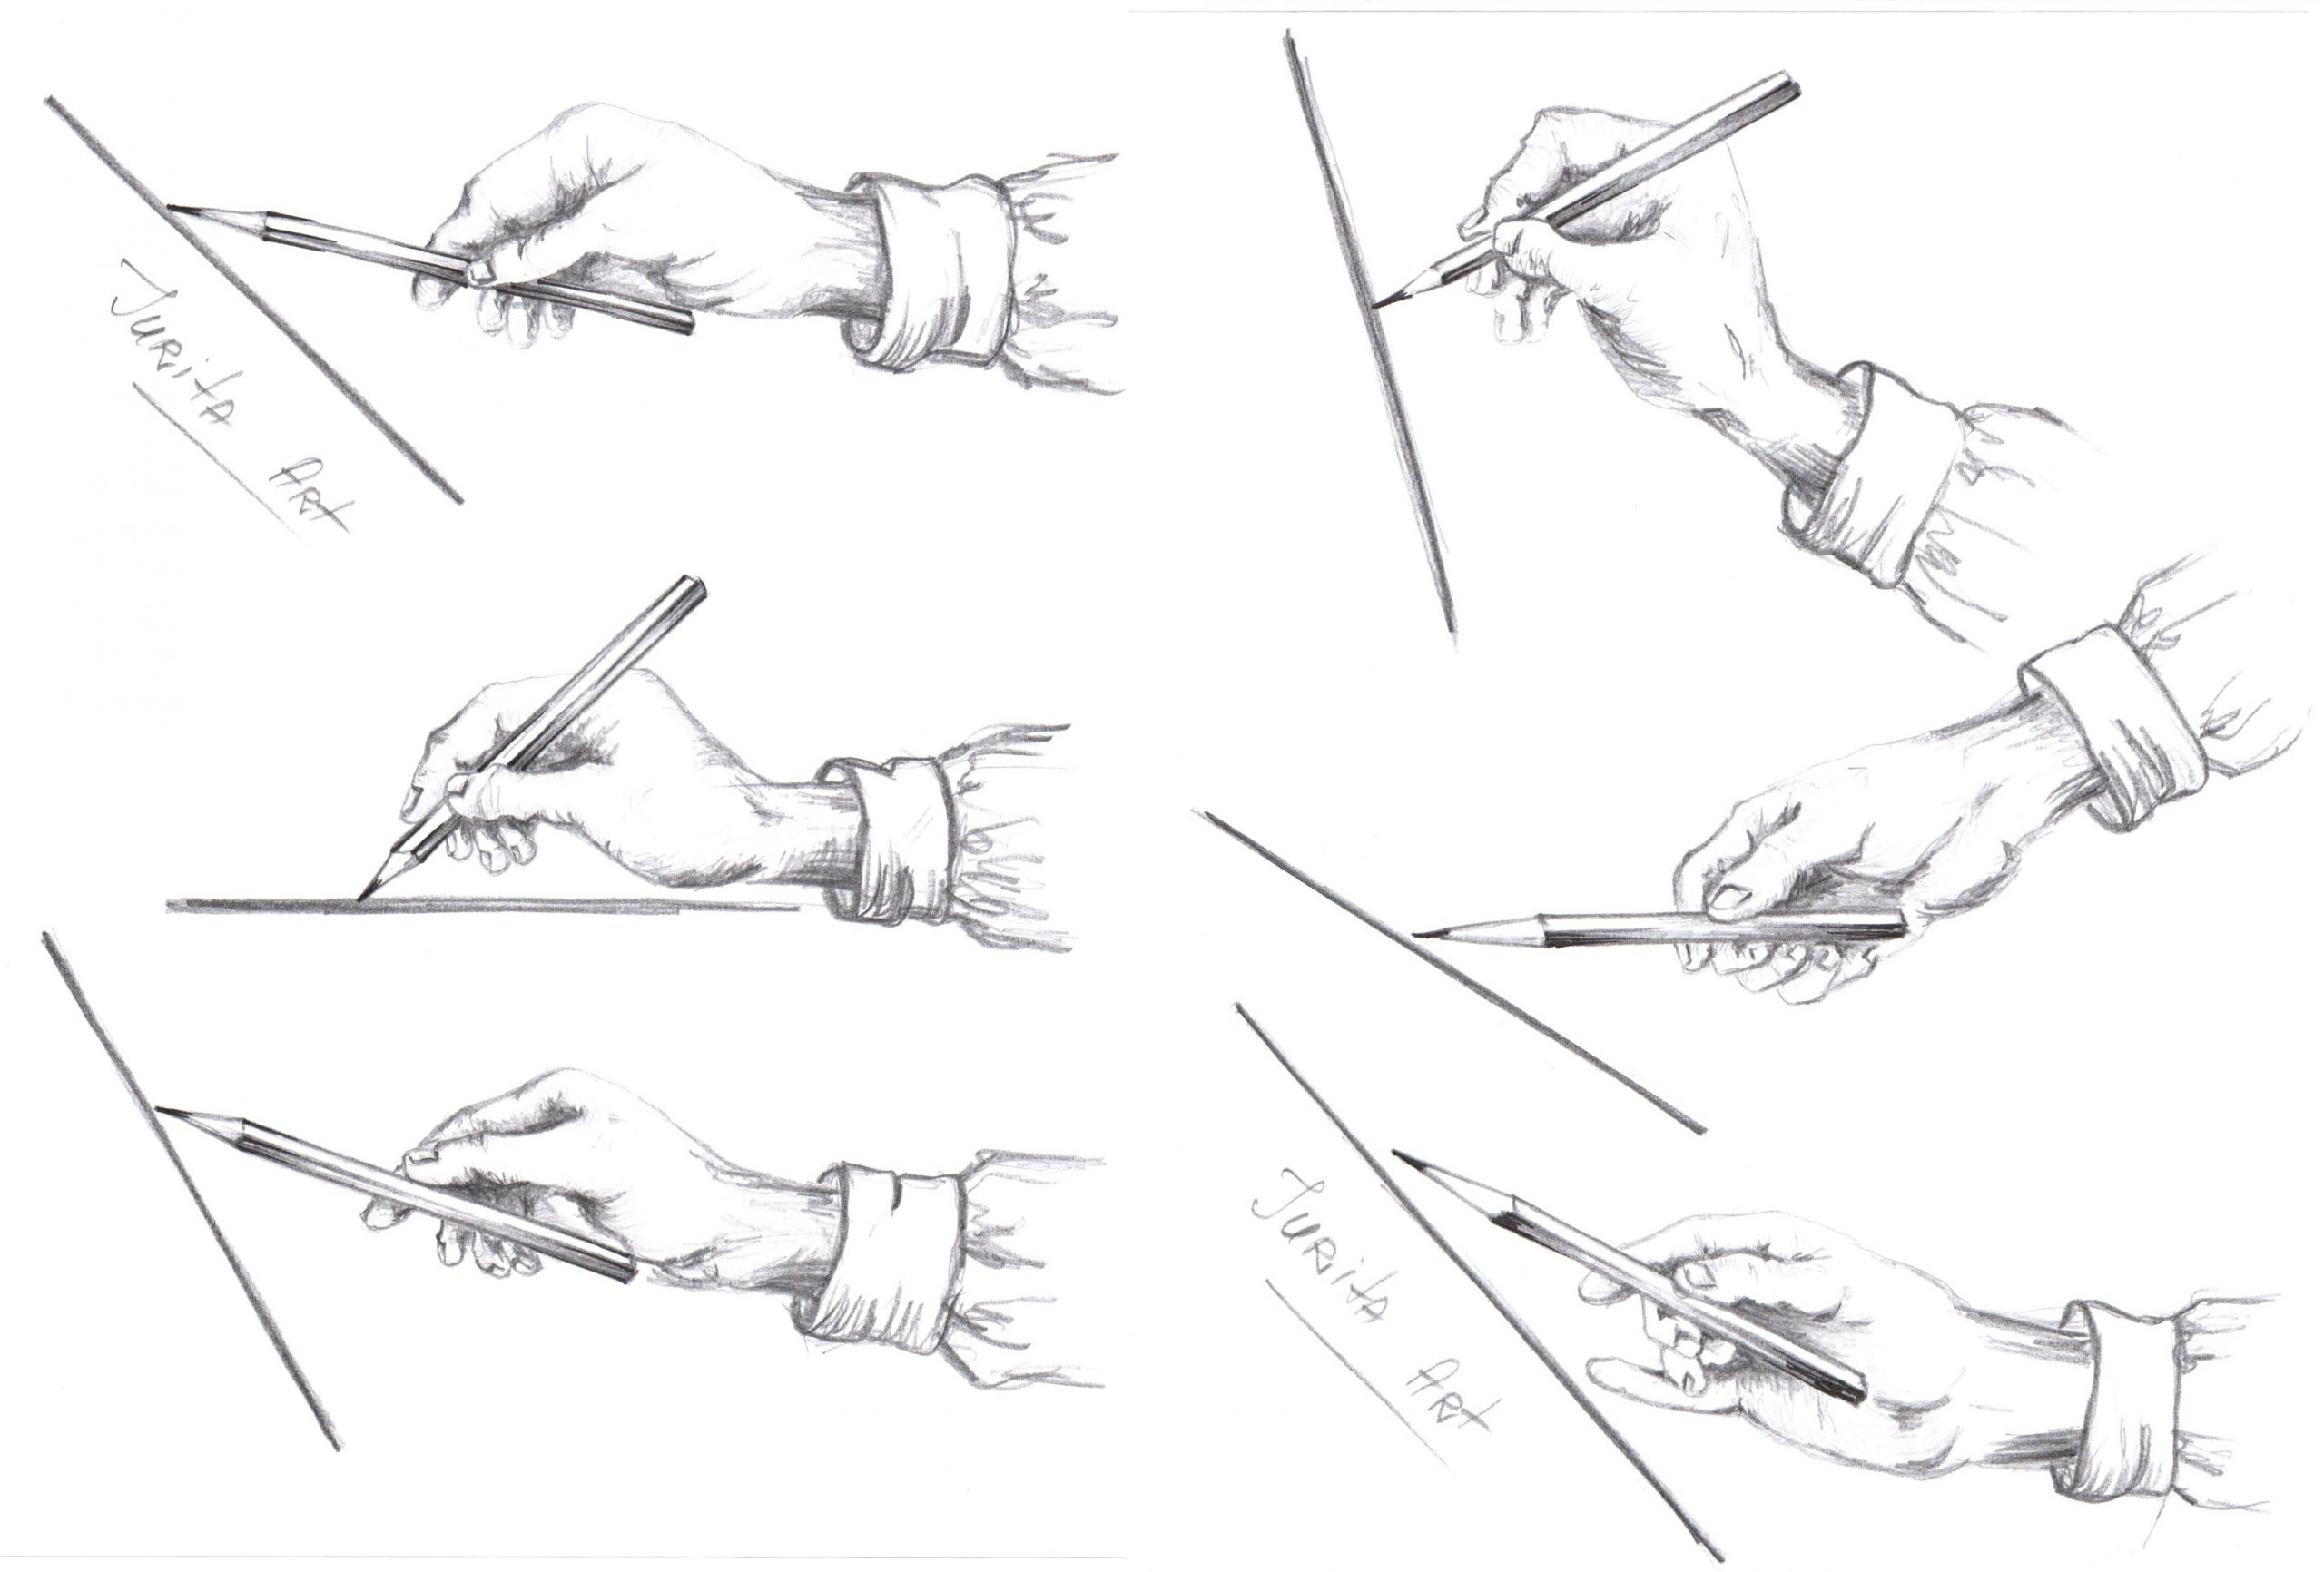
2.1 The best ways to hold your pencils
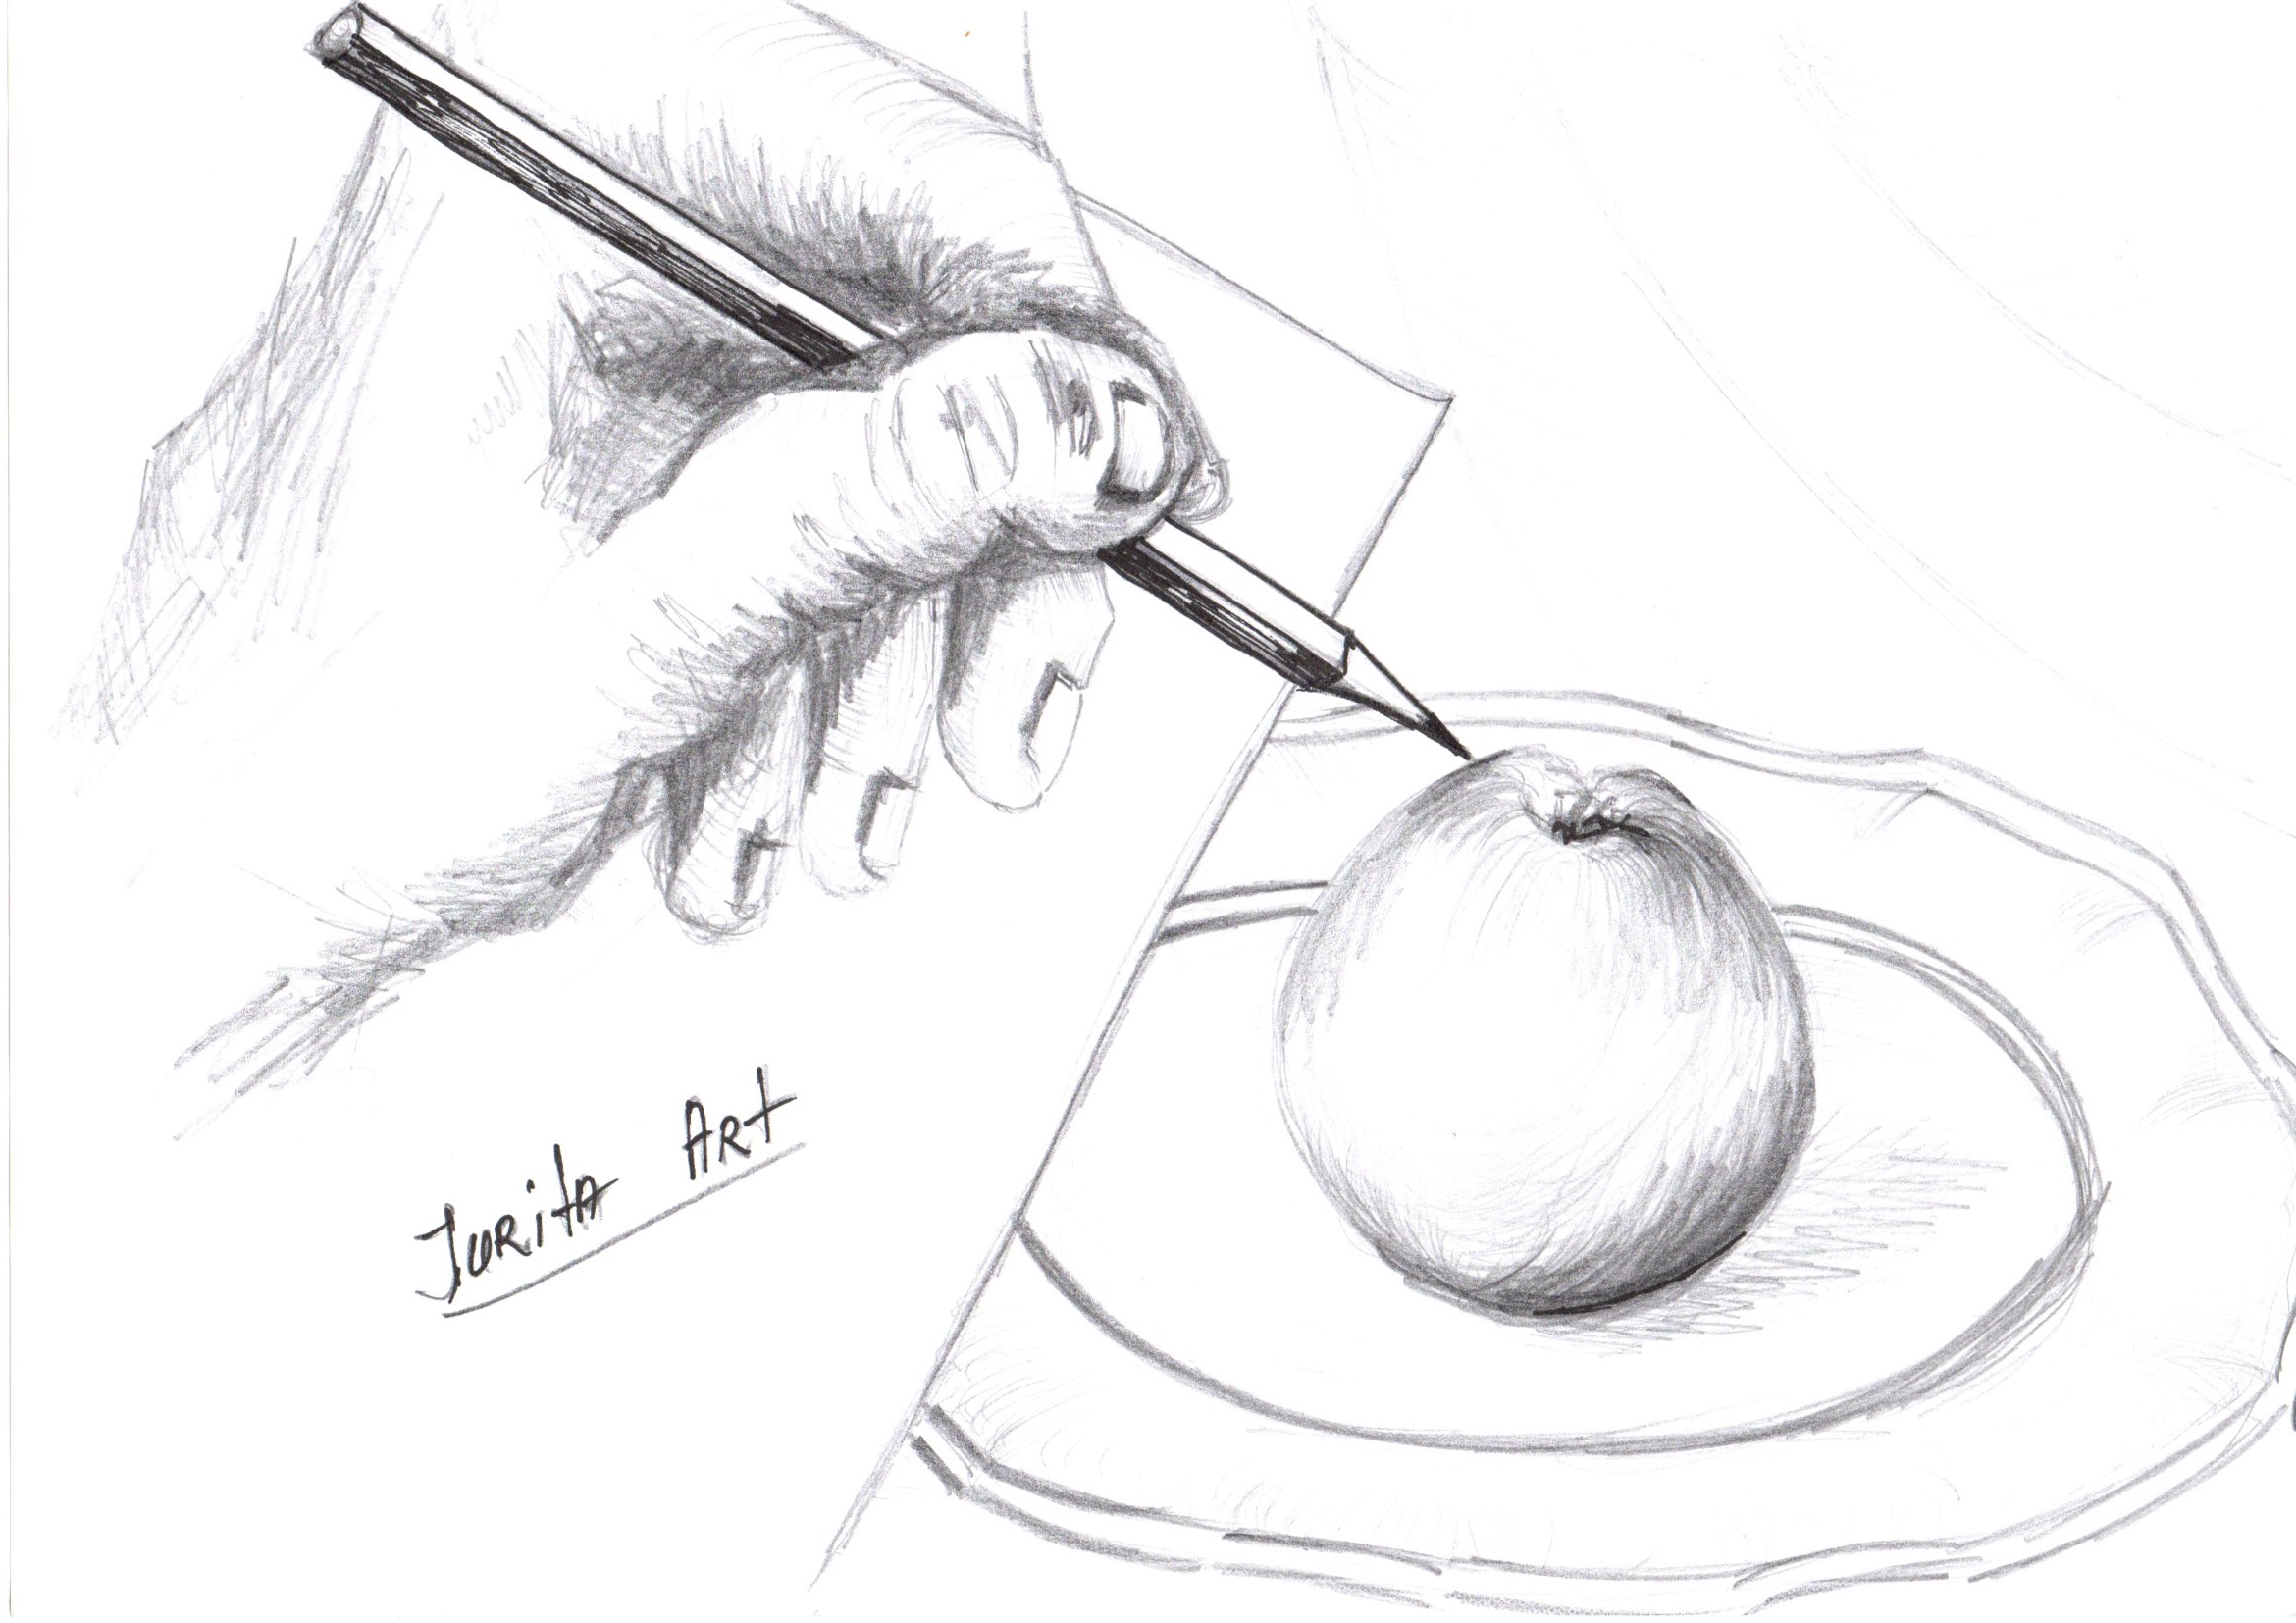
The first step is to master how to hold a pencil correctly. An outstretched hand holding a pencil rather far from the point of the lead keeps the artist at a distance necessary for a holistic perception of the drawing. Some aspiring artists hold a pencil in the same way as when writing. It is not right.
You need to accustom yourself to such a position of the pencil in your hand, in which you do not need to lean on the surface of the sheet, because you can smudge the drawing. It is difficult for novice artists to draw this way out of habit: it is awkward for an inept hand to hold a pencil again, it quickly gets tired in an extended position. With some effort, you can learn to hold your pencil professionally.
It is necessary to hold the pencil by the rough end between the nail phalanges of the thumb, index and middle fingers – touching the surface of the paper only with a lead and occasionally with the little finger and keep the required distance from work.
Things like how fast you draw a line and the weight you put into a stroke will change the look of the line.
In the correct position, the pencil just touches the sheet, and does not cut with a point and does not push the paper. Touches with the tip of the pencil give a very light, airy line, sometimes a sharper and more confident line.
Long lines are drawn with the entire hand. Short lines are drawn with a brush. Short lines and strokes – with the fingers holding a pencil. When covering large areas, I shade with my pencil perpendicular to the line I’m drawing to get wide, soft lines. The only time I use the point is when I’m working on intricate details , narrow marks.
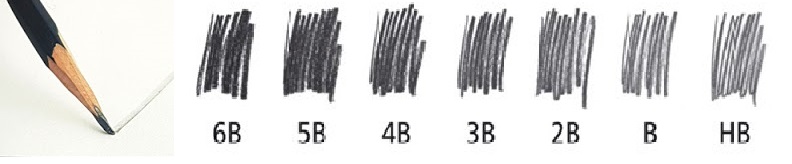
2.2 Which pencil should I use for drawing?
The pencil you choose will have a big impact on both the techniques you can use and the look of your find artwork.
Different pencil types are better for different styles of artwork, and you also need to consider the hardness of your lead.
Traditional graphite pencils are available in a scale of hardness from 9H (hard, pale) to 9B (soft, dark), with HB and F sitting the middle of the range.
The higher the number, the harder the rod, the lighter the pencil line on the paper will be.
The lower the number, the softer the rod, the correspondingly darker the trace on the paper.
In general, “B” will indicate color saturation, and “H” will indicate lightness (or hardness).
Typically, the H grades are suited to technical drawing, while B grades are ideal sketching pencils.
2B or 3B pencil is a good place to start with general pencil drawings.
2.3 Vary line thickness
Varied line thickness can help add depth to a drawing. Varying the thickness of the line you use help guide your viewer through your drawing.
When I start drawing, I avoid committing too early with hard, dark lines. Use light lines to explore and dark lines to commit. As I progress my lines will change. I darken my lines and add details at the end. Before you move on to stronger lines and detail work, it’s essential to make sure you have the correct form down.
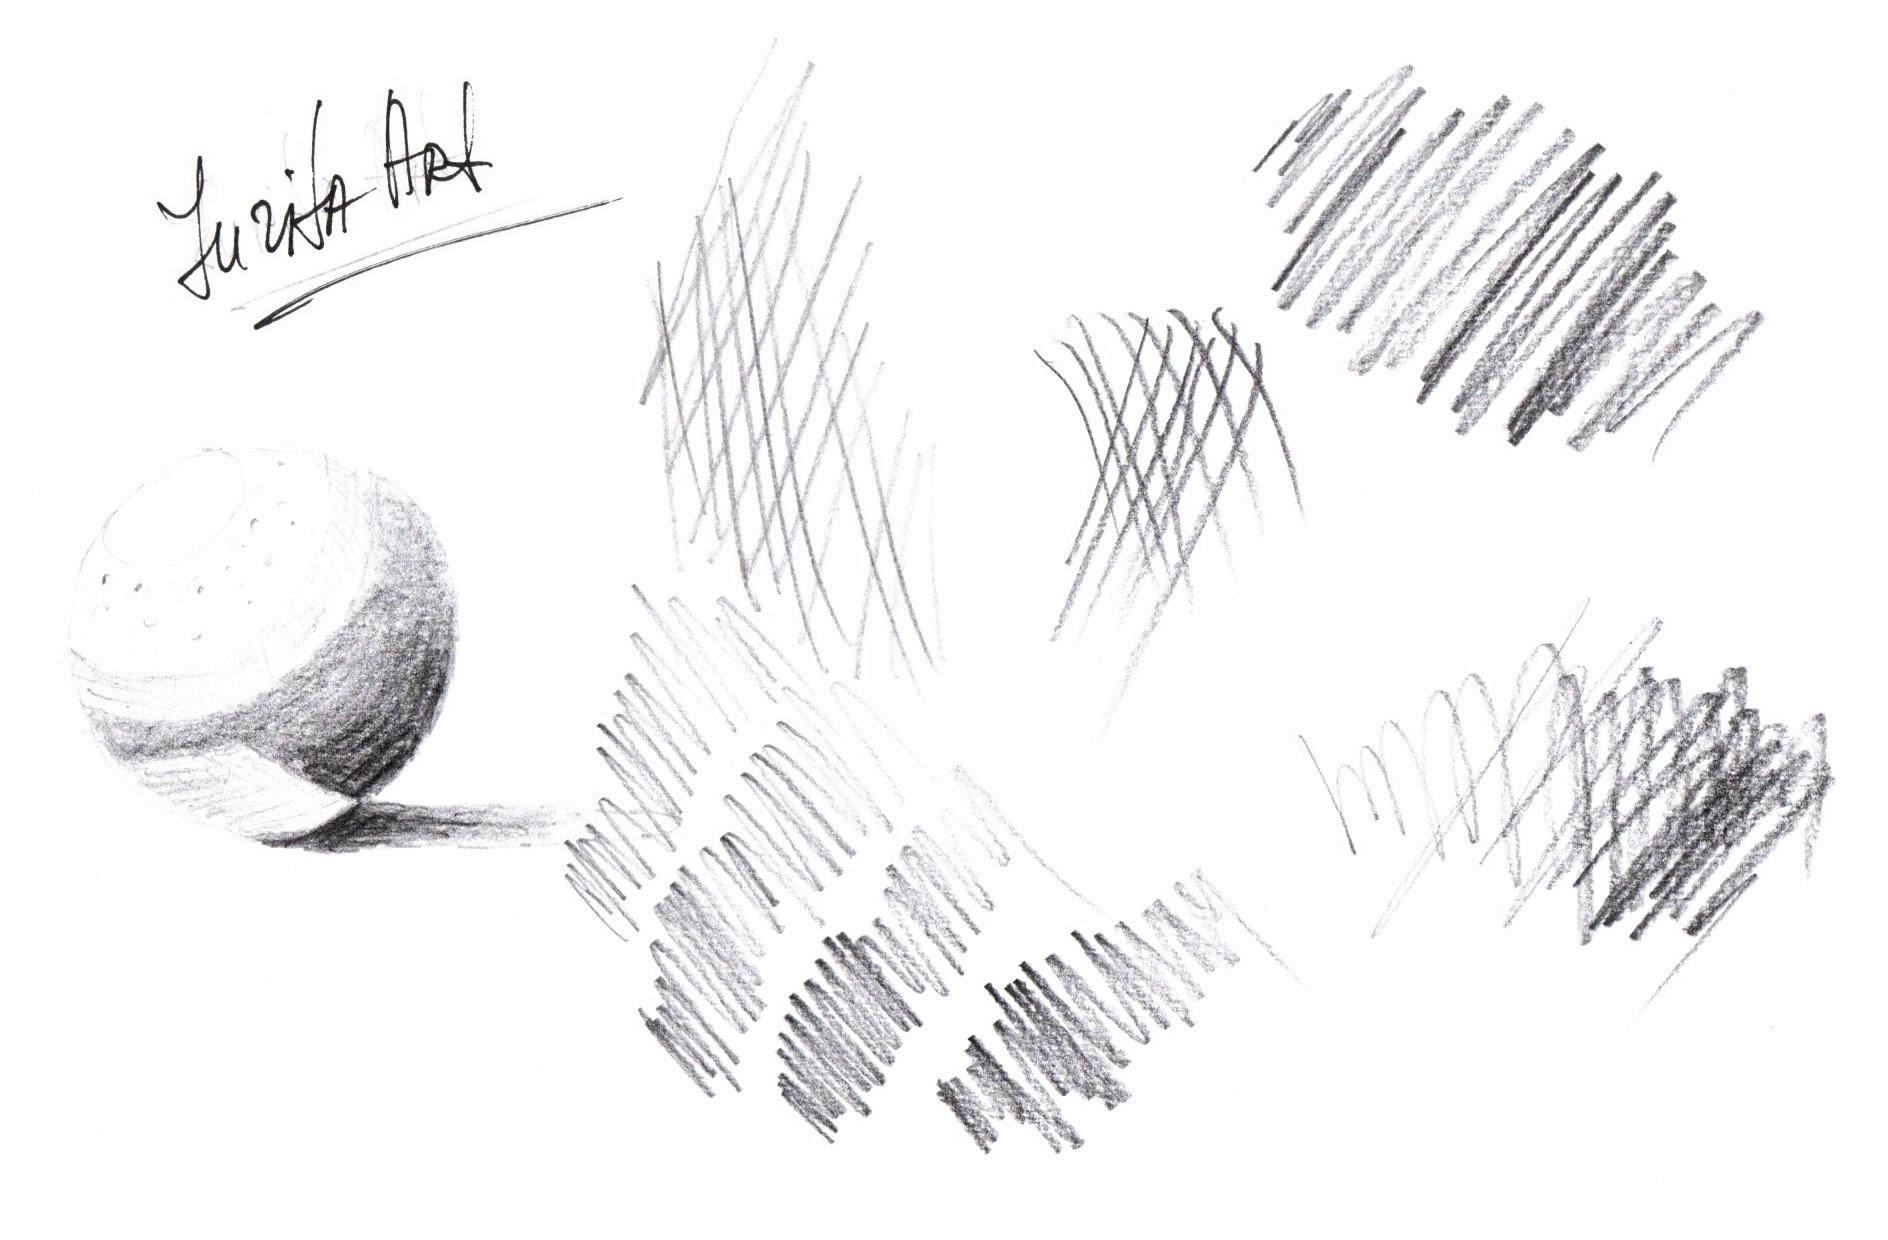
2.4 Shading techniques
The play of light and shadow is important from the point of view of a believable image and from the point of view of conveying emotions, mood, hopes and experiences.
When I start drawing, I avoid committing too early with hard, dark lines. Use light lines to explore and dark lines to commit. As I progress my lines will change. I darken my lines and add details at the end. Before you move on to stronger lines and detail work, it’s essential to make sure you have the correct form down.
I try to avoid outlining my drawings because this tends to make things look flat and deadens the 3D effect. Breaks and spaces in my lines show form in the lights and shadows. If you want to express your perception of the world through the vision of life around you, then you need to learn the means available in the artist’s arsenal to reflect on paper the walls of houses, roads, trees, sky, clouds, etc.
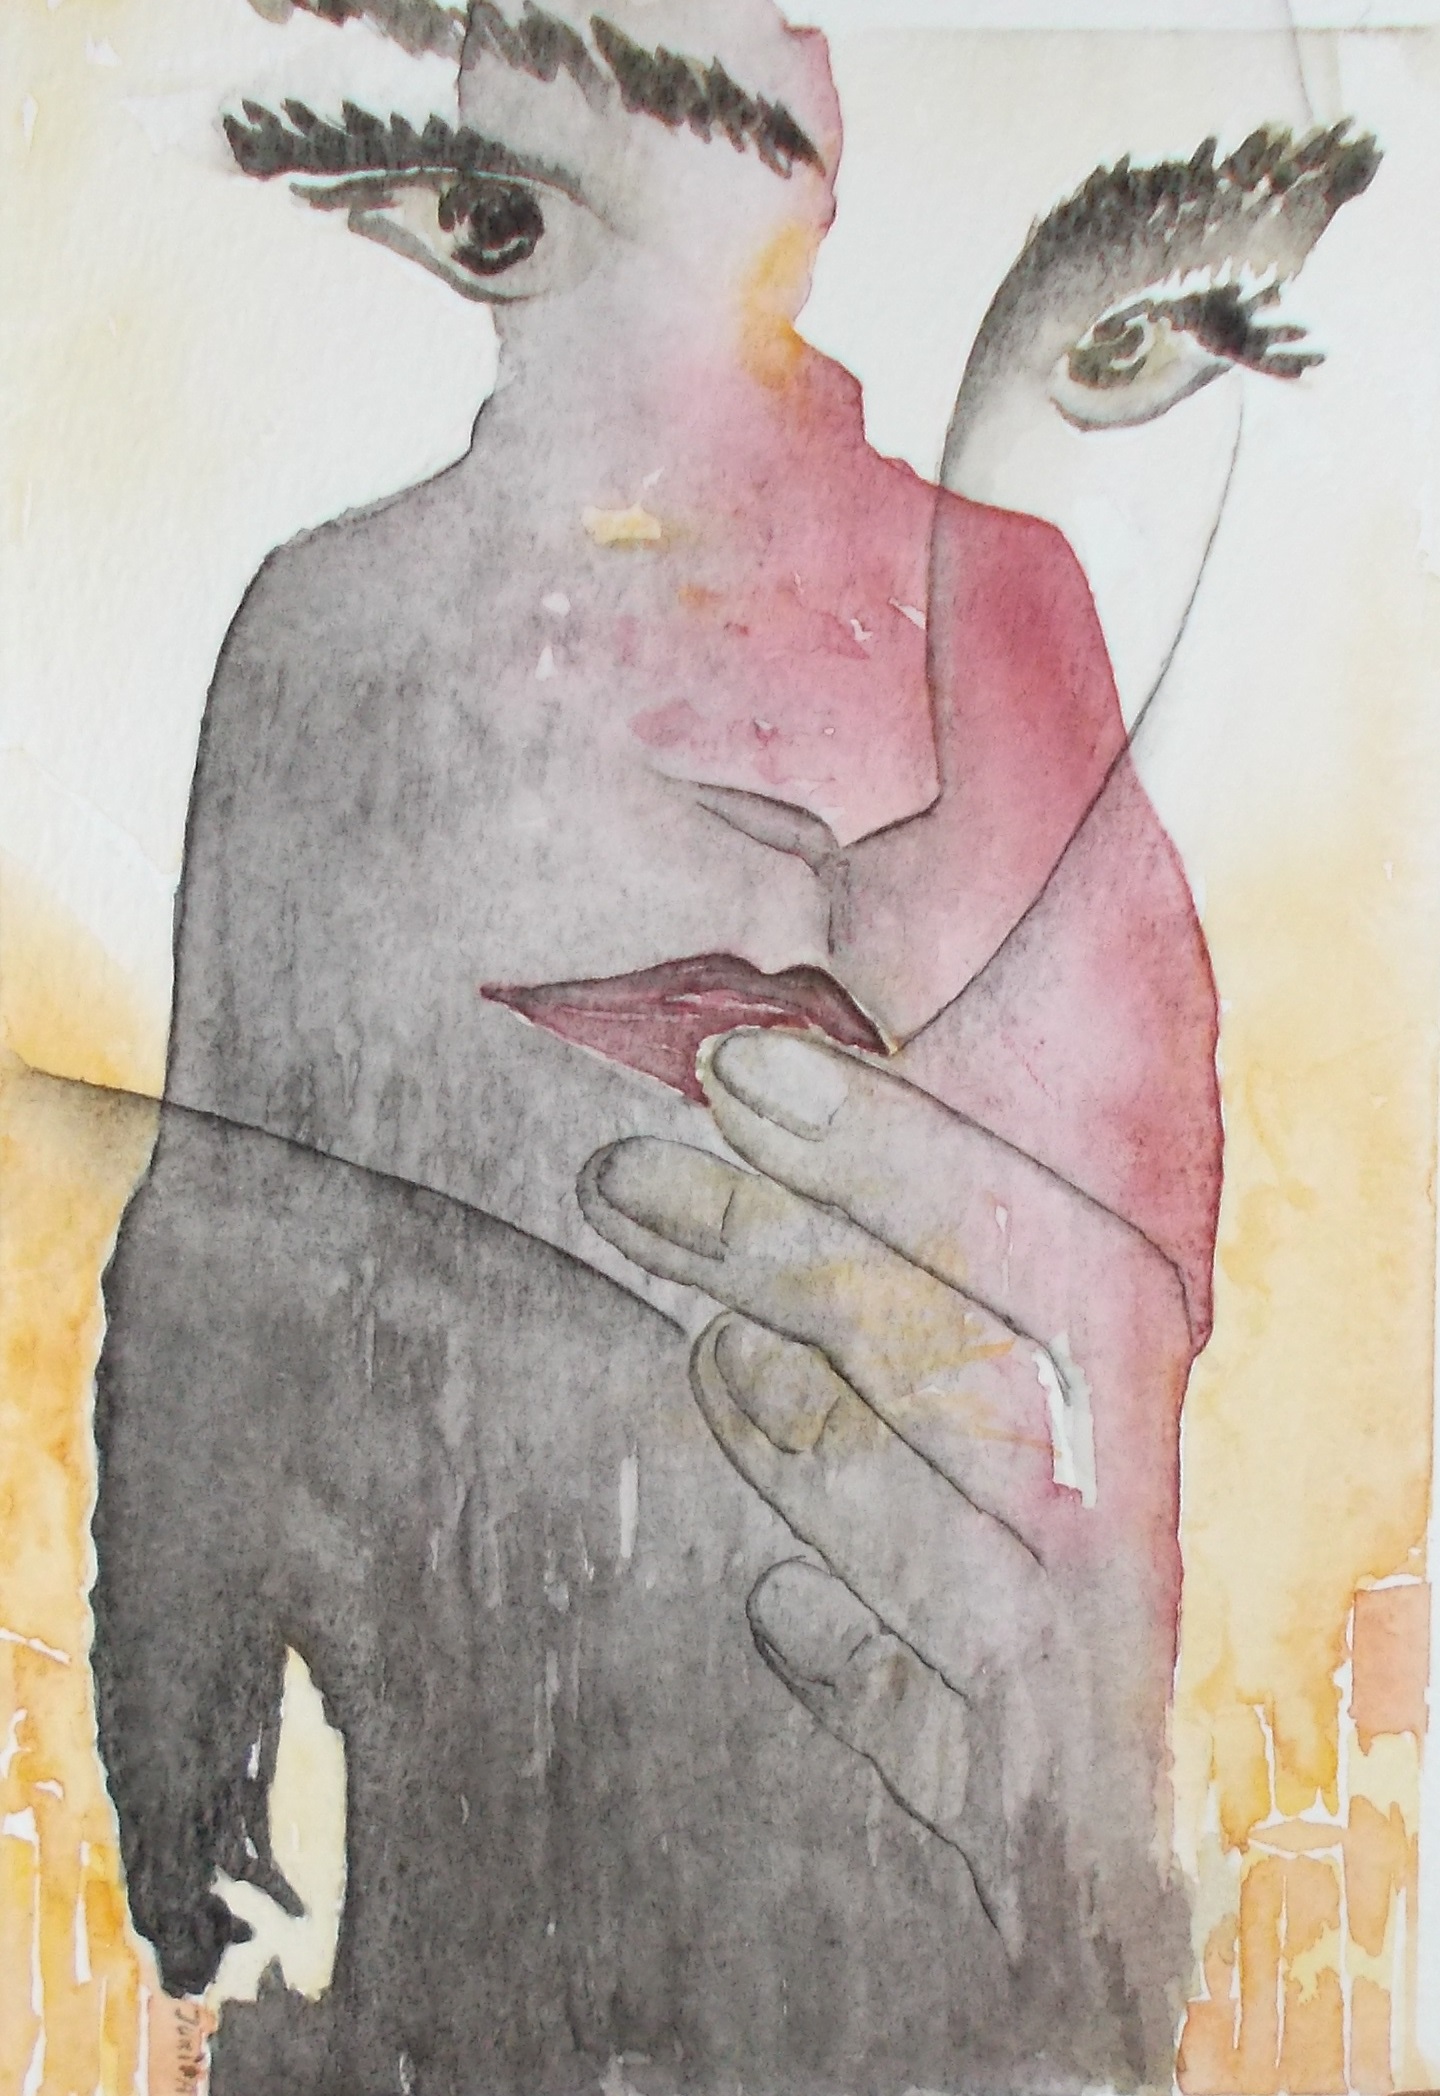
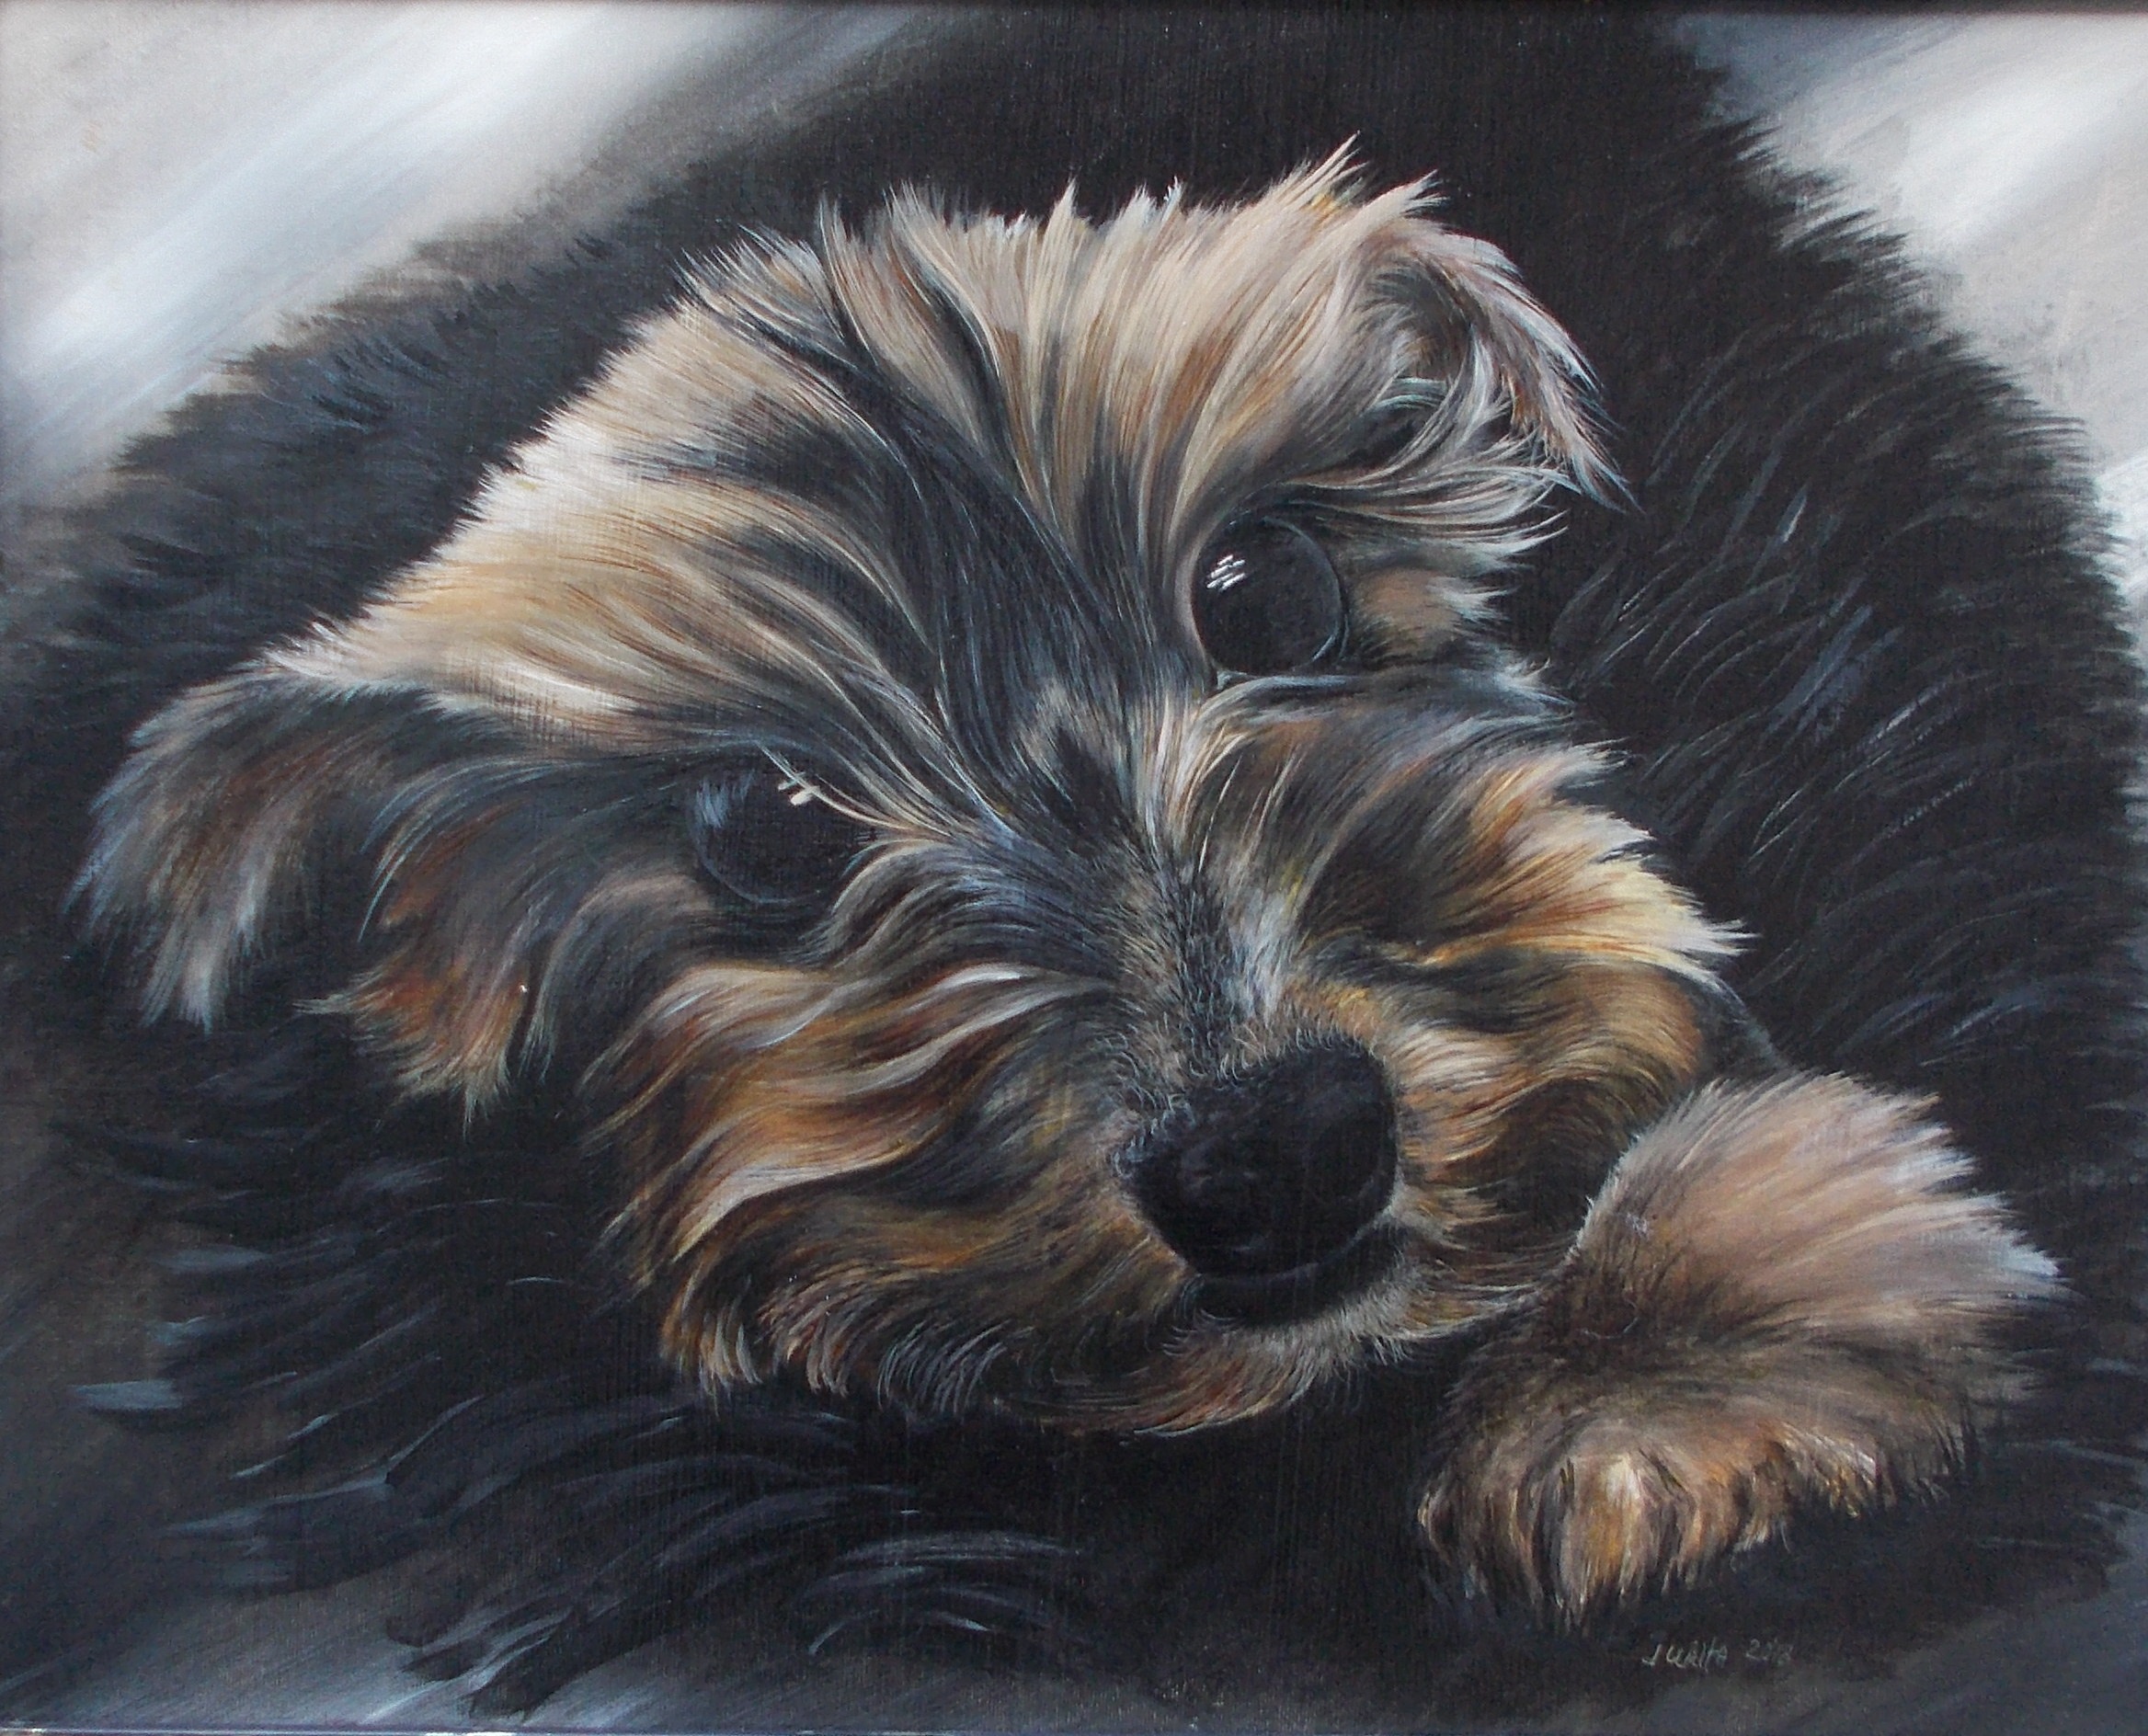
How to choose the direction of the stroke, and how to determine this direction? It’s all about the shape of the object and how you feel this shape. Beautiful shading can make your drawing a work of art.(Jurita, 2020, pencil and black ink drawing, A-4 format for the workshop “Drawing Basics by Jurita Art / Pencil Drawing Techniques”).
There are lots of different pencil drawing techniques relating to shading. Two main approaches.
The first is with all the lines going in the same direction.
The second method involves working in patches of shading, to help define shape.
Patches of lines go around the form, which help keep things in perspective.
Thicker lines can fade and disappear into the shadows, which can help convey the 3D form.
Techniques of shading:
1) Circulism: Used to shade a base layer to give it a consistent base texture.
2) Contour Shading: Used to shade.
3) Hatching: Used to shade.
4) Cross Hatching: Used to create patterns and to emphasize deep.
2.5 Not to stain the surface
Pencils are prone to smudging, and the softer they are, the more difficult it is to keep things clean. Essentially you don’t want to be resting your hand on areas you’ve already drawn. In order not to stain the surface on which the drawing is applied with a pencil or ink, you can put a sheet of tracing paper under your arm.
2.6 Work left-to-right
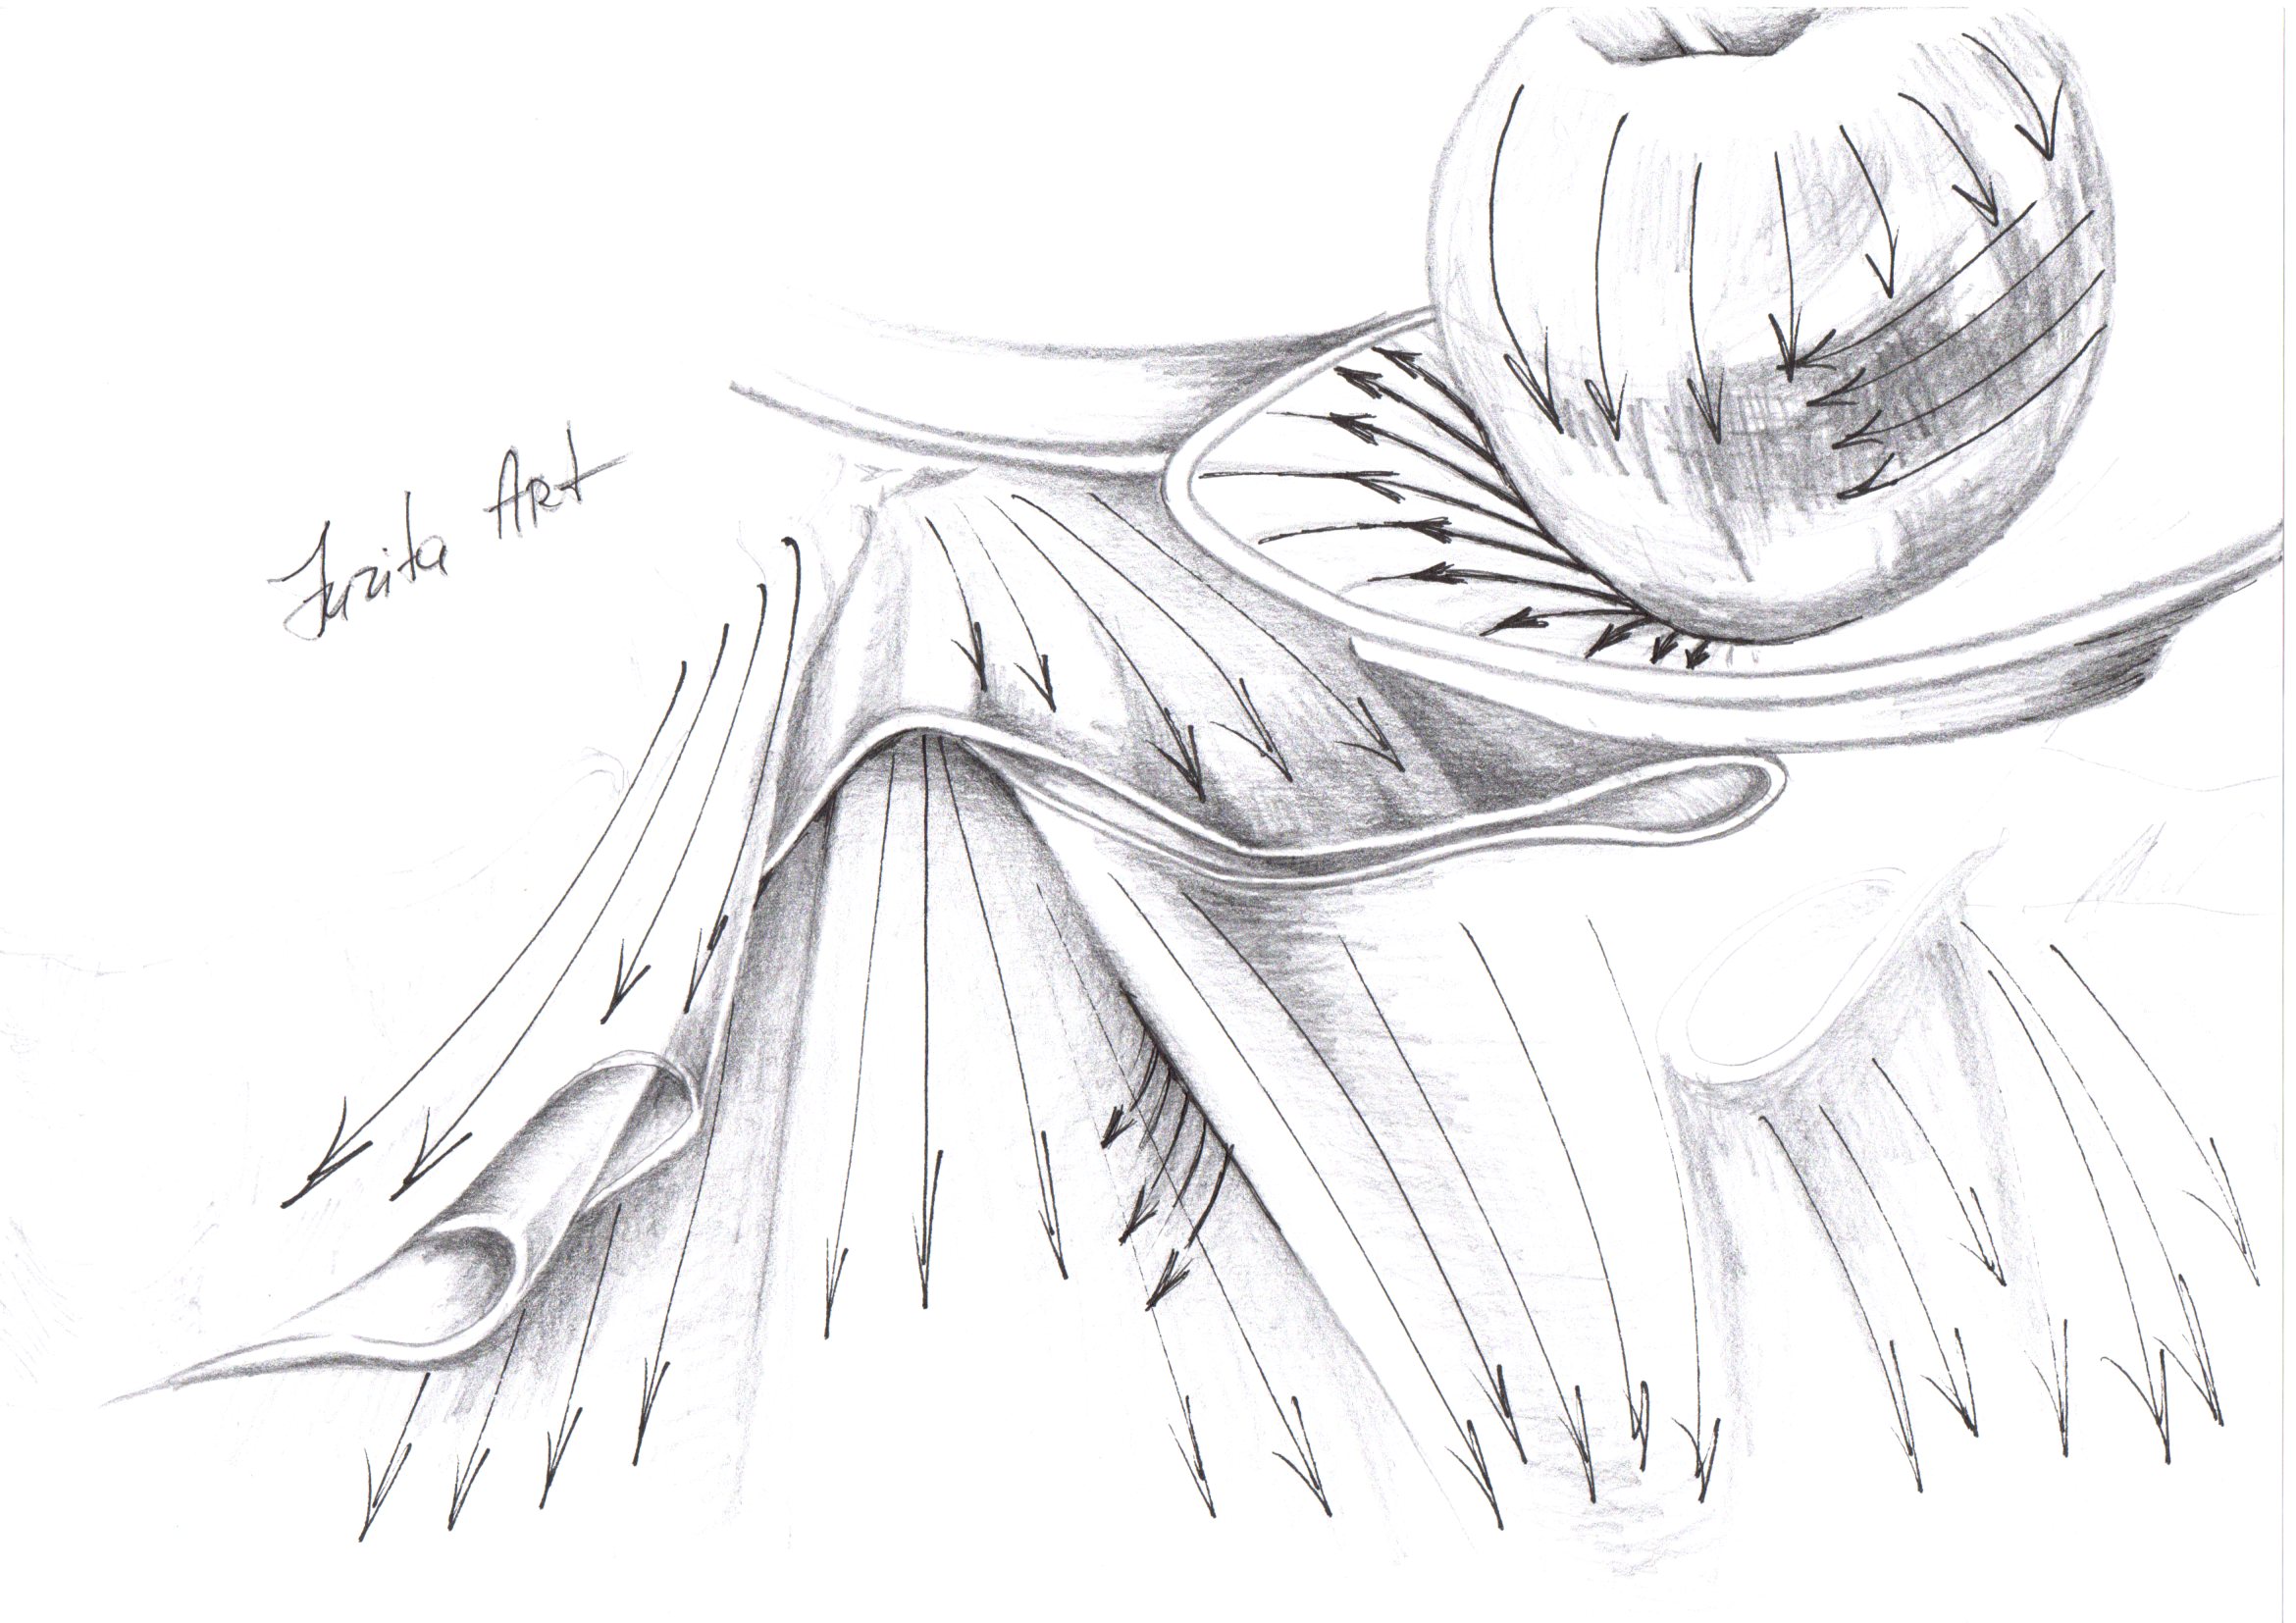
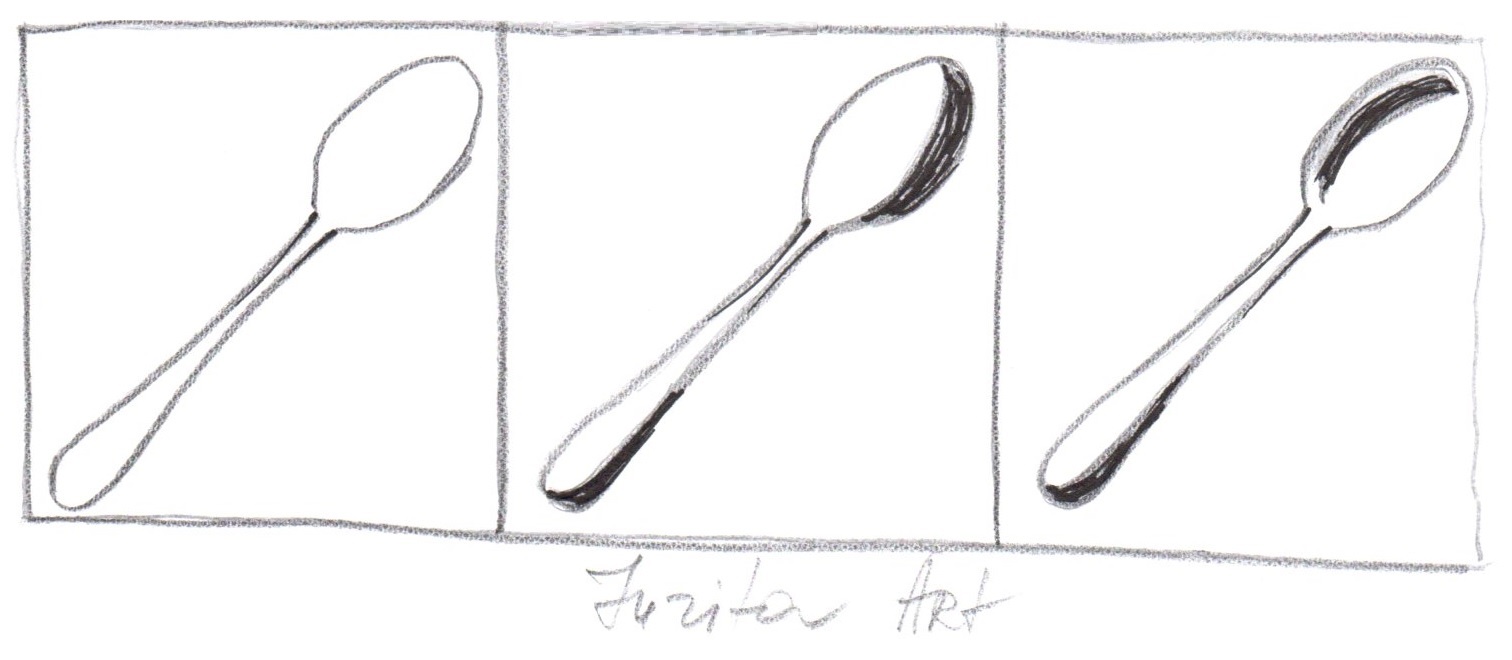
Planning which area of the composition you work on first can help. Then right-handers should work left to right, and lefties move right to left. From left to right, input line drawing, convex shading of the spoon and concave shading of the spoon. In both cases light is coming from the yellow dot in the upper left corner.
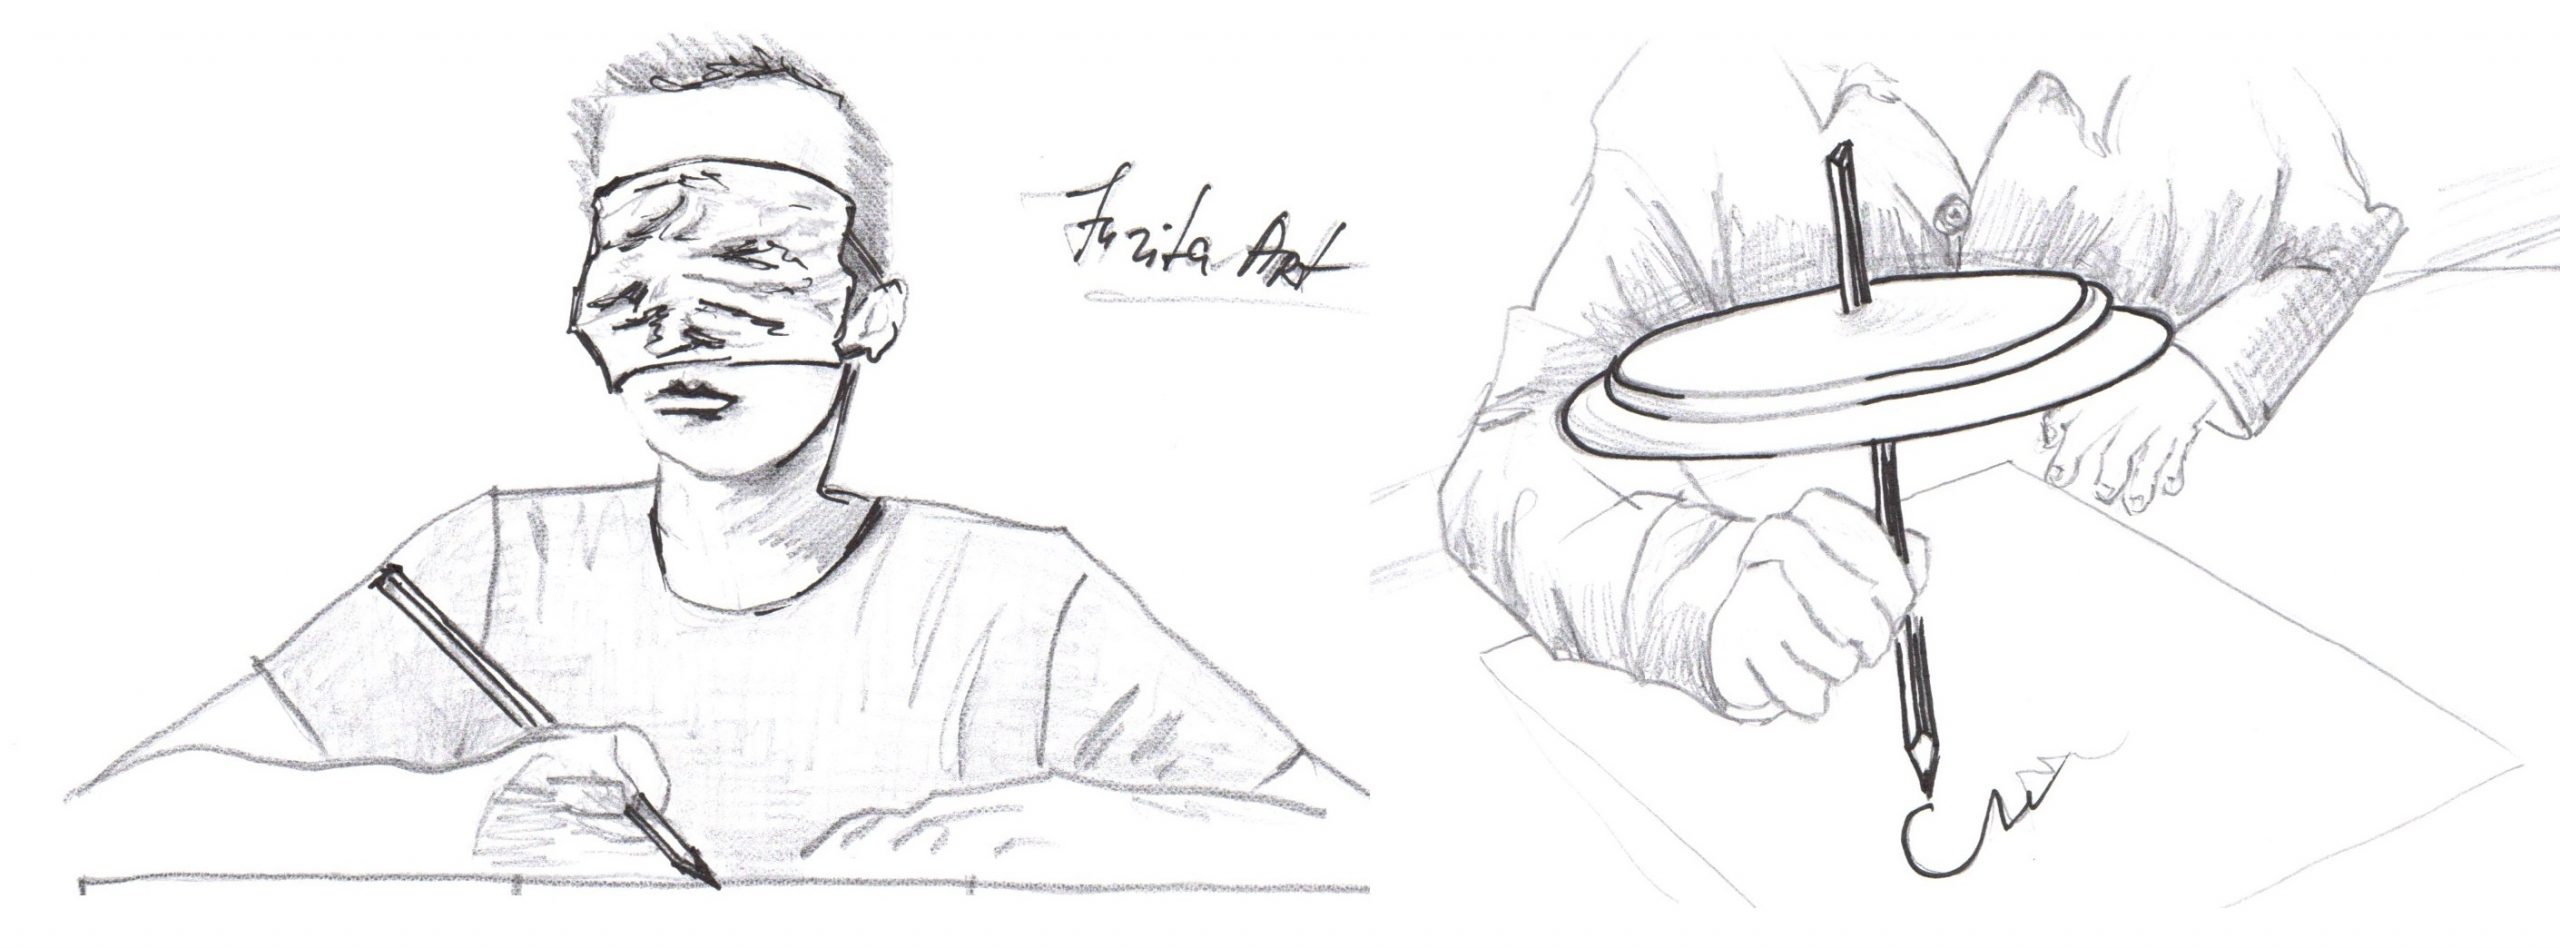
2.7 Blind contour drawing
Creative activity is largely based on work from memory and imagination. The essence of the method is that the artist does not look at the paper. All his attention is on the model. Hand and eye movements are synchronized. It is as if we visually feel the nature and transfer it to the sheet.
Set up a subject in front of you and fix your eye on the top of it, placing your pencil on your paper. Then we look only at the subject and do not get distracted by the paper.
2.8 Start with an underdrawing
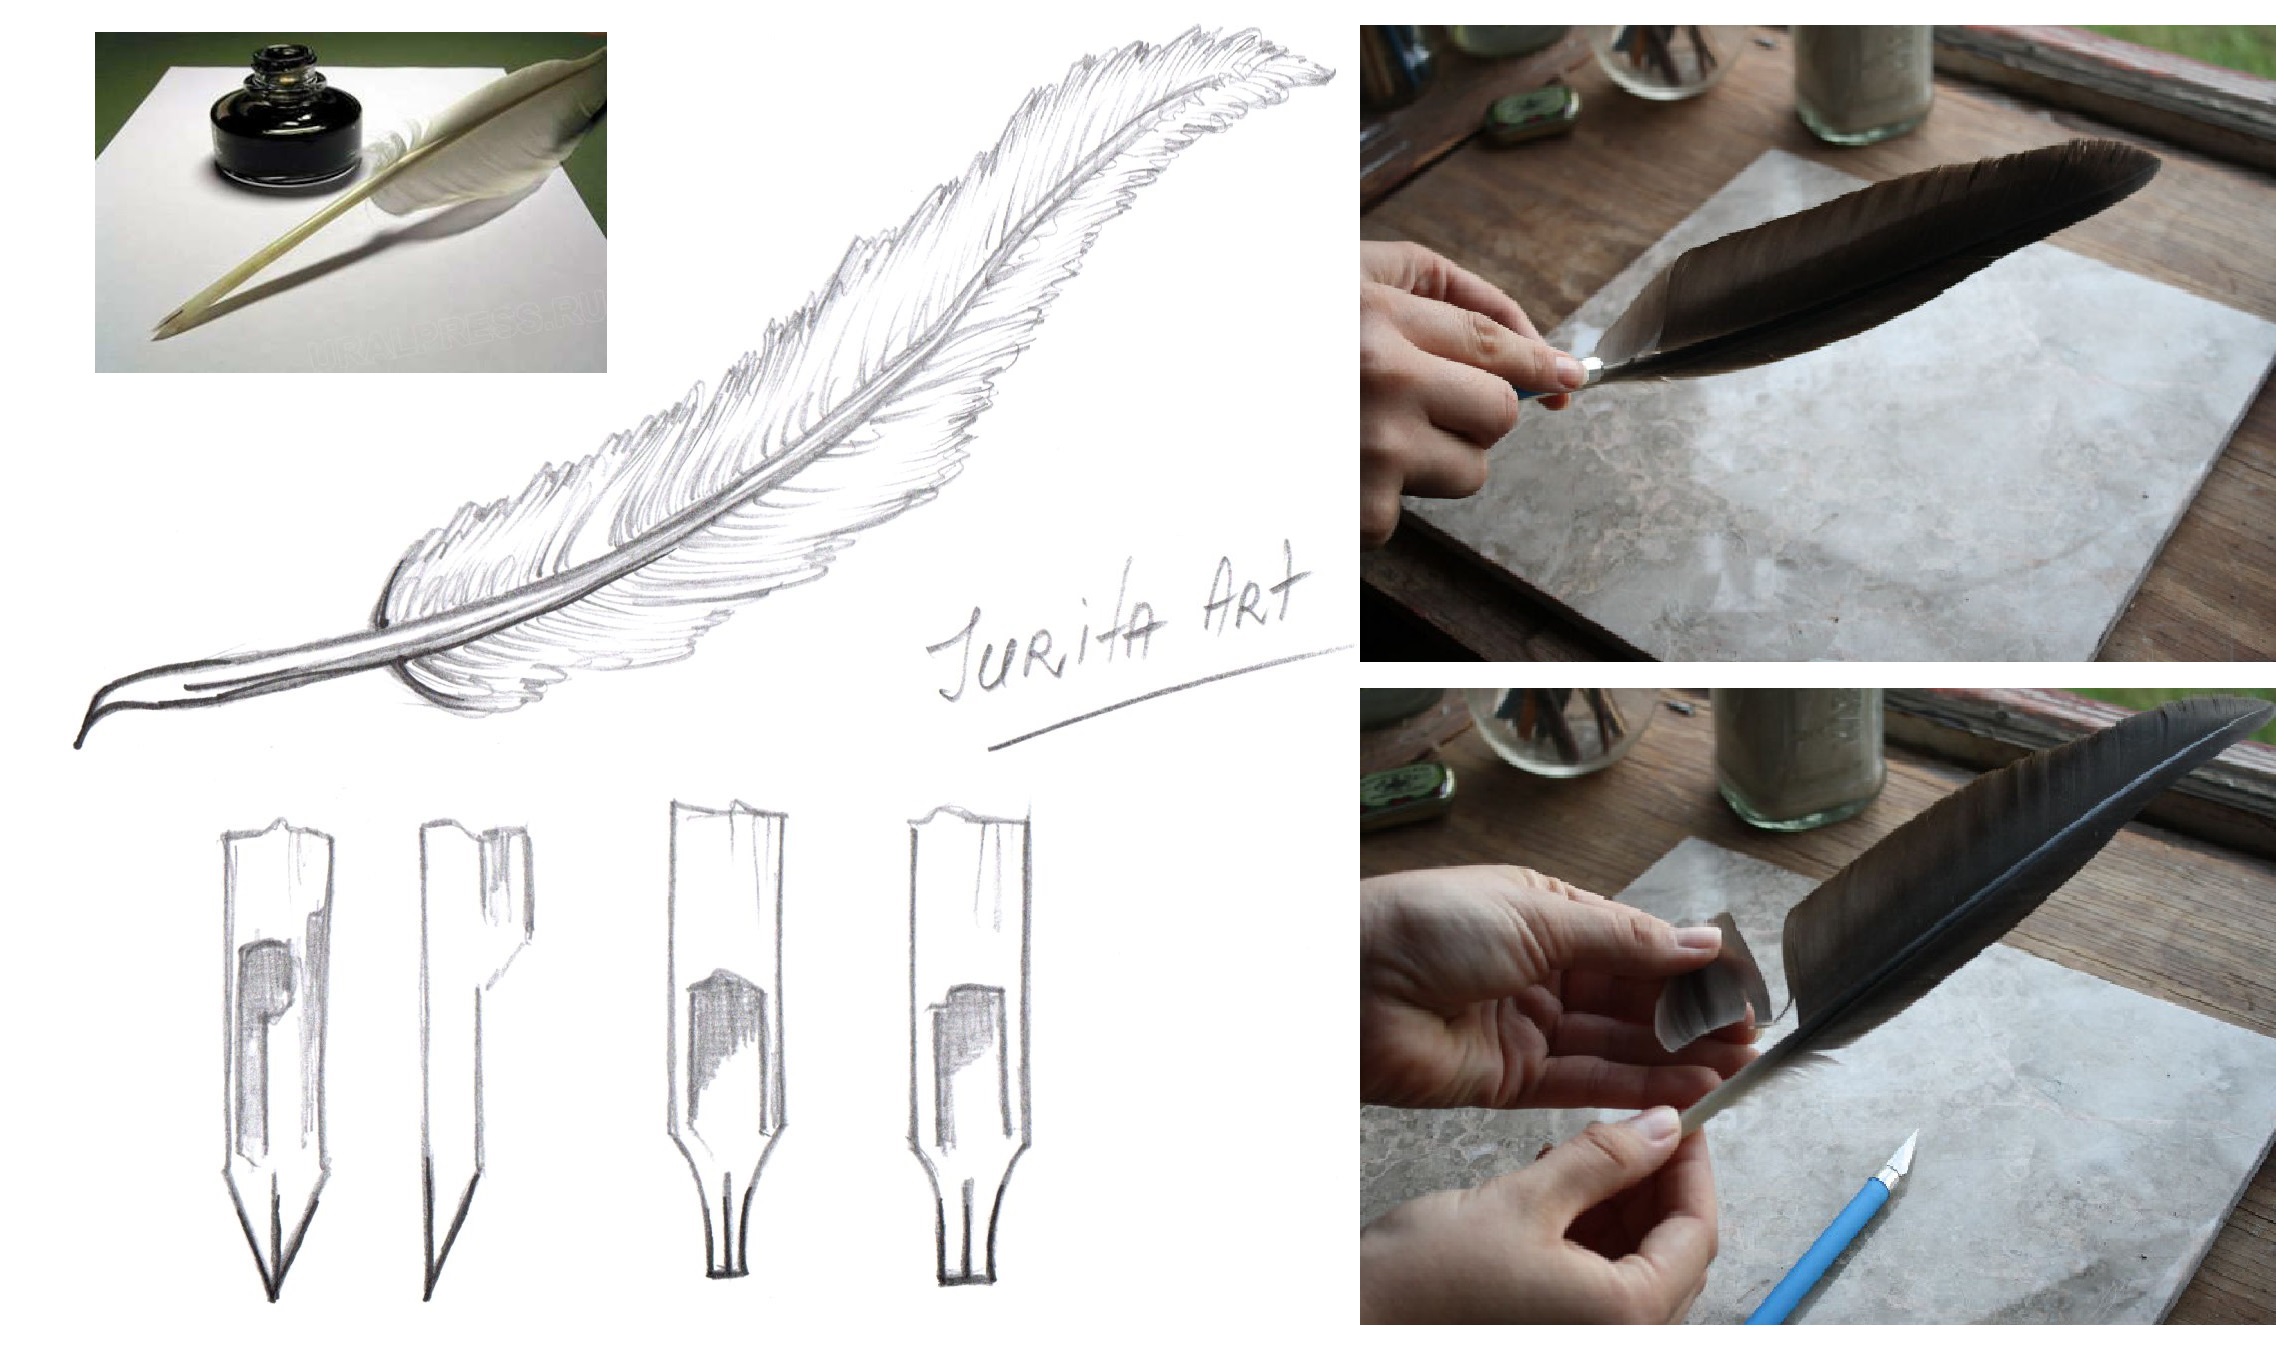
A underdrawing, elaborated in detail, is an integral part of the process of working on a painting. In the Middle Ages of various periods, an important role was assigned to the preliminary drawing. The drawing was usually applied with a pen or a thin brush with ink – black, brown, red in various shades.
Since the 7th century, a sharpened bird feather was used to write a letter. But not every feather could be suitable for this process. Most often they were crows, peacocks or swans. The goose feather has served man perfectly for a whole millennium.
It is said that the domination of the goose feathers sharpened for writing ended in this way. The servant of one man, who wrote a lot and because of this constantly changed pens, felt sorry for the owner. And one day the thought occurred to him why not make the same feather, but from a more durable material.
Over the past 200 years, a lot of specially sharpened writing pens have been invented: stationery – with sharp ends and with a curved nose, poster – they were used by artists, cartographic – they were used to draw maps, sheet music had a double split and were used by scribes of music. Writing pens were of various shapes (for example, in the shape of the Eiffel Tower), they depicted portraits of the Emperor Napoleon and the Queen of England. For noble people, writing pens were decorated with personal coats of arms. A well-made and beautifully sharpened nib could be an expensive gift.
However, the quill is not that ancient writing device. The earliest were kalamas, which were used for writing in ancient Egypt 4500 years ago. They were sharpened cane sticks dipped in ink. Unfortunately, kalams have not “survived” to this day, they are not in any museum, but we have the very manufacture with a detailed description of their use.
The Egyptians had another invention for writing, which was found in the tomb of Tutankhamun. It is a lead tube with a pointed end. Inside it was a reed filled with a dark liquid, which, flowing down to the very tip, left a dark mark on the papyrus. Thus, it is once again confirmed that the Egyptians invented a writing medium before the idea of using a quill pen for writing appeared. But everyone forgot about it, and the pen was considered the only invention for writing.
Already from the 7th century, a sharpened bird feather was used to apply a preliminary drawing. Most often they were crows, peacocks or swans. The goose feather has served man perfectly for a whole millennium.
The drawing was usually applied with a pen or a thin brush with ink – black, brown, red of various shades.
How to be in this situation?
Well, first of all, don’t wash. All lines are needed, including the wrong ones – they will eventually merge and create tone. If the line seems out of place, do not erase it. Draw one more next to it, then another – until you find the exact one. It can be highlighted brighter, and the rest can be hidden behind shading. For this, construction lines must be light and light enough.
Drawing can be done with hard pencils and without unnecessary pressure. Therefore, the preliminary drawing can be done with hard pencils and without unnecessary pressure. This makes finding the correct line much easier than erasing and drawing on a blank sheet of paper each time.
Remember – the most important thing in drawing skill is 5% talent and 95% practice. We stroke in the shape of the bends of the fabric, slightly changing the direction of each subsequent layer of strokes that are superimposed.
2.9 Check the overall effect of your work
Step back regularly to check the overall effect of your work, and ensure you’re keeping your line steady throughout. Not only should you be aware of the look of your line but also the pressure you’re applying to the pencil and on the paper.
Know when to stop
Is this finished? Maybe… The majority of artists have a tendency to tinker with their work – even after they’ve signed their name.
I can always find something to change if I look hard enough, so it can be difficult to tell when a piece is truly finished.
Eventually, I make a conscious decision to put my drawing away and start something new.
3 Using the right tools
3.1 Sharpen correctly
If you need to write something or sketch a sketch, a sharpener is enough. It is best not to twist the pencil in the sharpener, but to rotate it around the pencil – this will reduce the pressure on the lead.
If you need to draw on an easel or a vertical surface, you will need a clerical knife.
Well, or as an option, use sandpaper. There are special ones for artists, or zero from a hardware store is also an option.
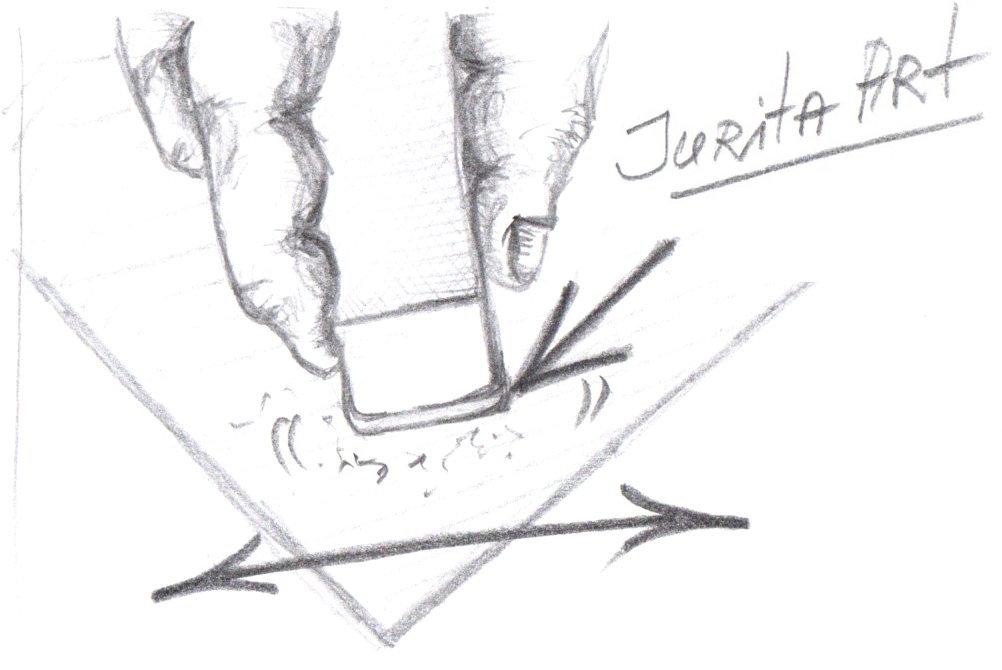
3.2 Clean up after yourself
The reliability of the drawing consists in observing all proportions. Invest in a putty eraser. Clean up your work as you go along. Invest in a putty eraser. An eraser is needed in cases where you need to erase something completely, to the color of the paper. They can always correct or slightly correct the inaccuracies of the sketch of the drawing.
Whenever a line gets too thick, I either erase the entire line or try to line up the eraser edge to slim down the existing line.
The eraser for removing pencil lines should be soft and flexible, should not smudge the lead and destroy the surface of the paper.
When erasing lines, the movement of the eraser is directed away from the hand supporting the paper to avoid wrinkling.
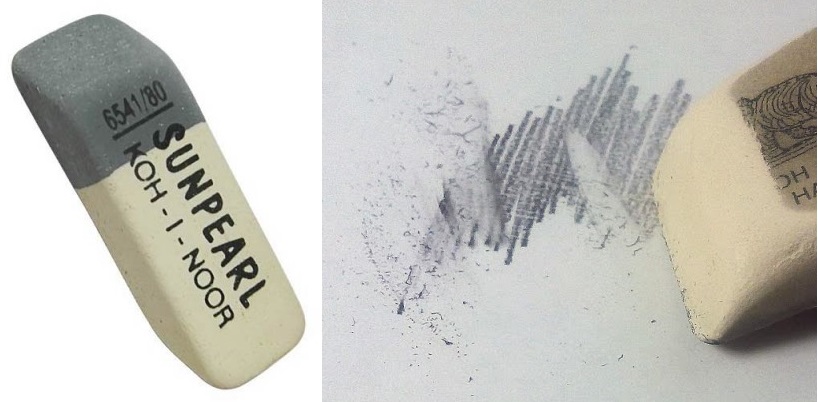
Cleaning your eraser
A dirty eraser leaves dark marks on the paper. You can prevent these smudges from forming by regularly cleaning your eraser and removing dark pencil marks from it. You just need to remove the top layer of eraser and get to the clean rubber.
In the process of working on a drawing, the gum cannot be held in a fist for a long time, since it, becoming wet, will smear and rub the lead into the paper.
Sandpaper will allow you to get rid of the dirt on the eraser pretty quickly. Choose a finer grit sandpaper to clean your eraser, or you will remove the extra layer of eraser and shorten its lifespan.
You can use a nail file instead of sandpaper.
3.3 Explore different paper textures
The choice of paper is always based on the choice of material with which a person will create. The paper should be thick, smooth and withstand several erasures with an eraser.
If you want to draw with pencils, take ordinary white sheets of paper or a sketchbook, and if water is used, then you need thicker watercolor paper that can absorb water.

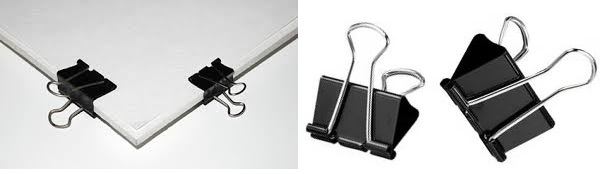
Protect your paper
Provide a solid basis by mounting your paper on a board. This helps to keep things in order and gives a solid surface to work on. It is important that it is convenient for you to draw and nothing interferes. By the way, the clamps are different, not only like in the photo. Pick those that are convenient for you.
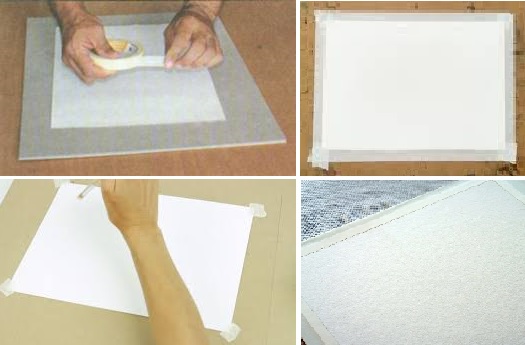
You can attach the paper to the board with paper-backed masking tape. The tape should not be too sticky, otherwise, when removing it from the drawing, there is a possibility that the paper under it will be damaged and tear along with the tape. The tape can be attached around the perimeter of your sheet to the tablet. Half of the tape will fix the paper, the other half will be glued to the tablet.
3.4 Convey character
It is important not only to capture the subject, but also to convey the character and mood of what he saw.
3.5 Unify your colours
Having a uniform approach to colour will help bring cohesiveness to your work. It’s a good idea to make sure that your artwork has unifying colours. I suggests creating a harmonious base by using tinted paper or adding a background wash of colour in paint.
3.6 Try combining pencils with watercolour
While pencils on their own can be used to create a wealth of different effects, it can be interesting to combine them with other media, to combine watercolour and pencils.
It’s important to start with watercolour and then layer pencils on top, she explains, because pencils can create a waxy surface that repels liquid, and prevents the watercolour from soaking into the paper.
3.7 Draw on your own experiences
Dip into your experiences to add a special layer of authenticity to your piece. This means using something like a memory, feeling or scent when creating your work. For example, a memory of a childhood experience. Whatever you choose makes the piece unique to you. I’ve found that people resonate with these pieces the most.
“My dog Bad Boy Tyler” is on my oil painting honouring Her Majesty love to dogs, that I created; in 2018 in London in my Art Studio. This is my kind message of support for The Queen and her family at time Coronavirus (COVID-19).
3.8 Break out of your comfort zone
There’s nothing wrong with stepping outside of the box if it means achieving the effect you want. Trial and error – The process is entirely fun. You need to dare, develop, reach a new level for yourself. It’s time to try a new visual technique, immerse yourself in unfamiliar visual techniques, switch to other materials, and maybe even plots. For example, I know that sometimes a simple change to the usual aspect ratio helps to get out of the comfort zone and feel your boundaries.
For example, if you choose an unusually large poster format for your work, or try to fit a drawing into a postage stamp.
3.9 Use contrasting concepts
One drawing technique is to use contrasting concepts within a piece of work, for example, juxtaposing beauty and ugliness. The beauty of flowers and something opposite to all this, for example, anything that can cause discomfort to the viewer. To me this is a very stark representation of what life is like.
4 Practical task
4.1 Questions, exercises and creative tasks
1. What is a drawing? Give it a definition.
2. What kinds of patterns do you know? Describe them.
3. Tell us about the history of the development of drawing.
4. List the art materials used for the drawing.
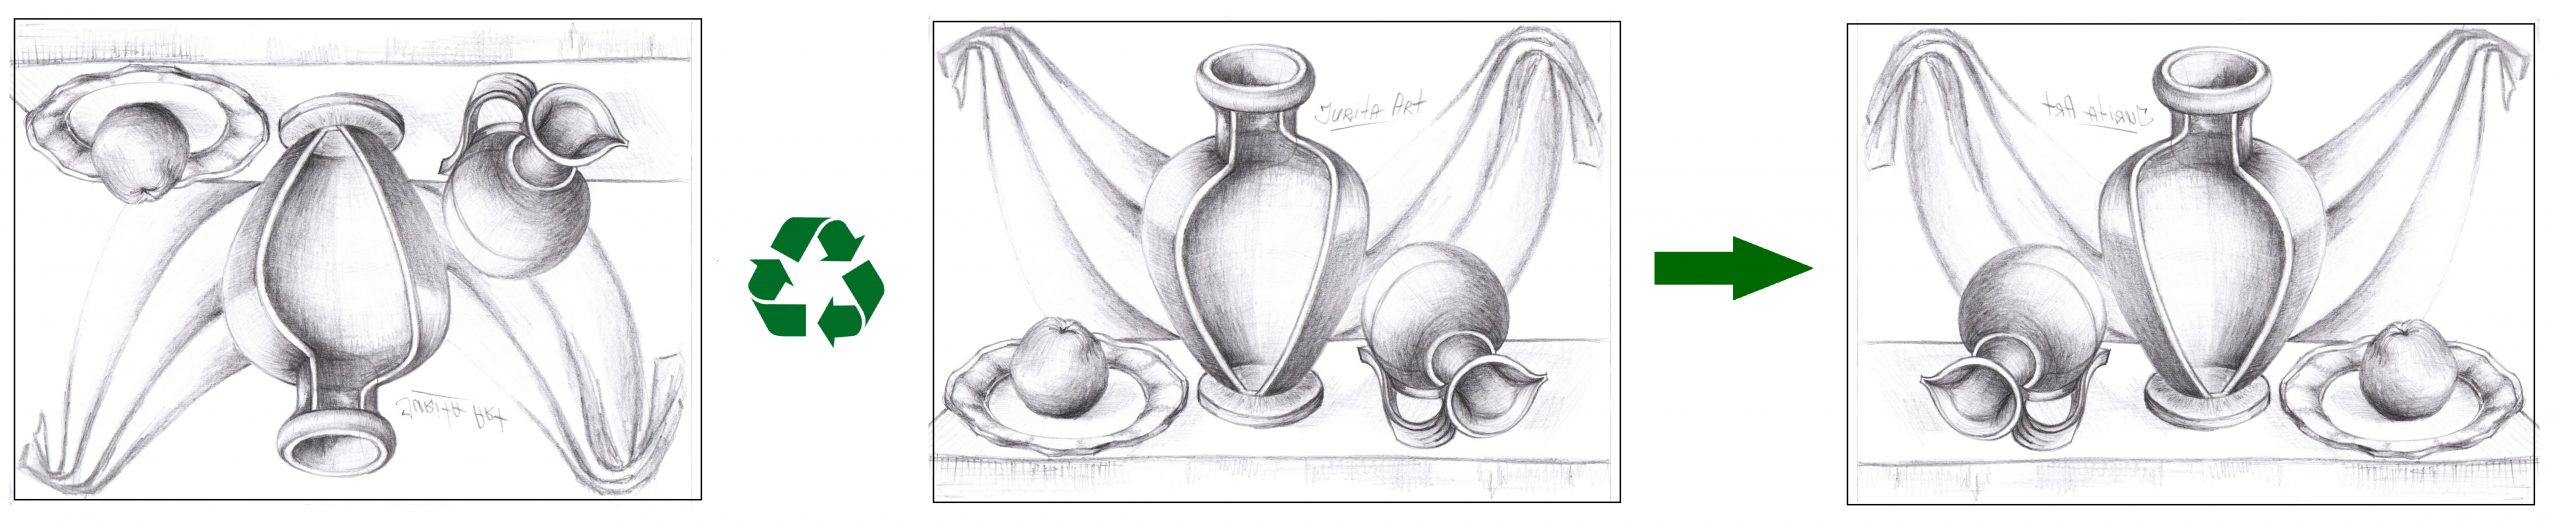
4.2 Practical Activity: Drawing a Still Life (pencil)
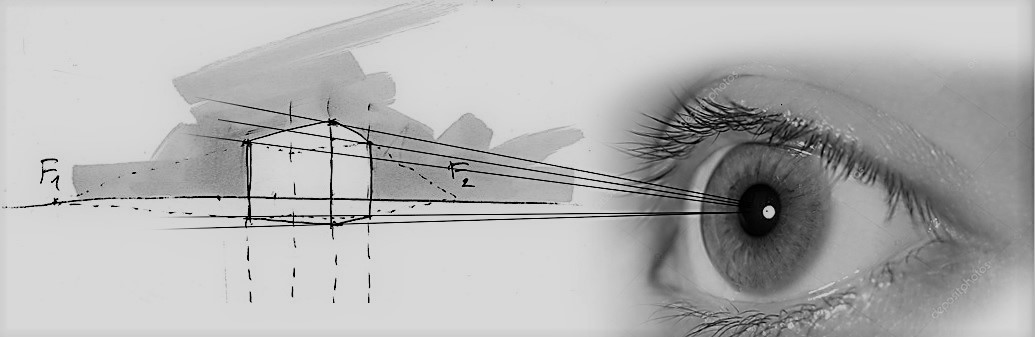
1. Compositional construction of a group of geometric bodies, determination of the perspective position of objects.
2. Clarification of proportions of geometric bodies, removal of construction lines.
3. Determination of cut-off relations.
4. Clarification of tonal relationships, generalization and completion of work.
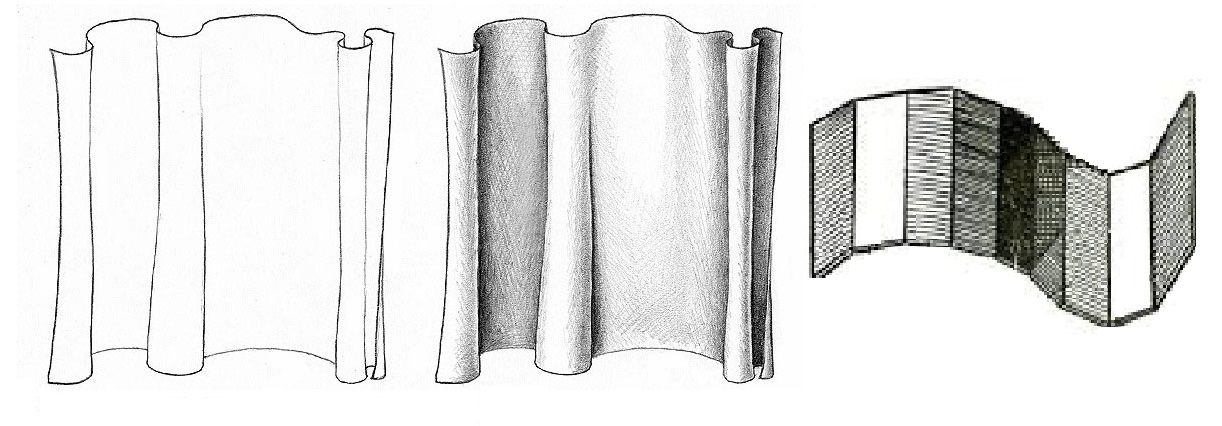
4.3 Practical Activity: Drawing a Drapery (Pencil)
When drawing and recreating fabric, all types of folds can be divided into three distinct categories: hanging / relaxed, stretched / tense, and wrinkled / compressed.
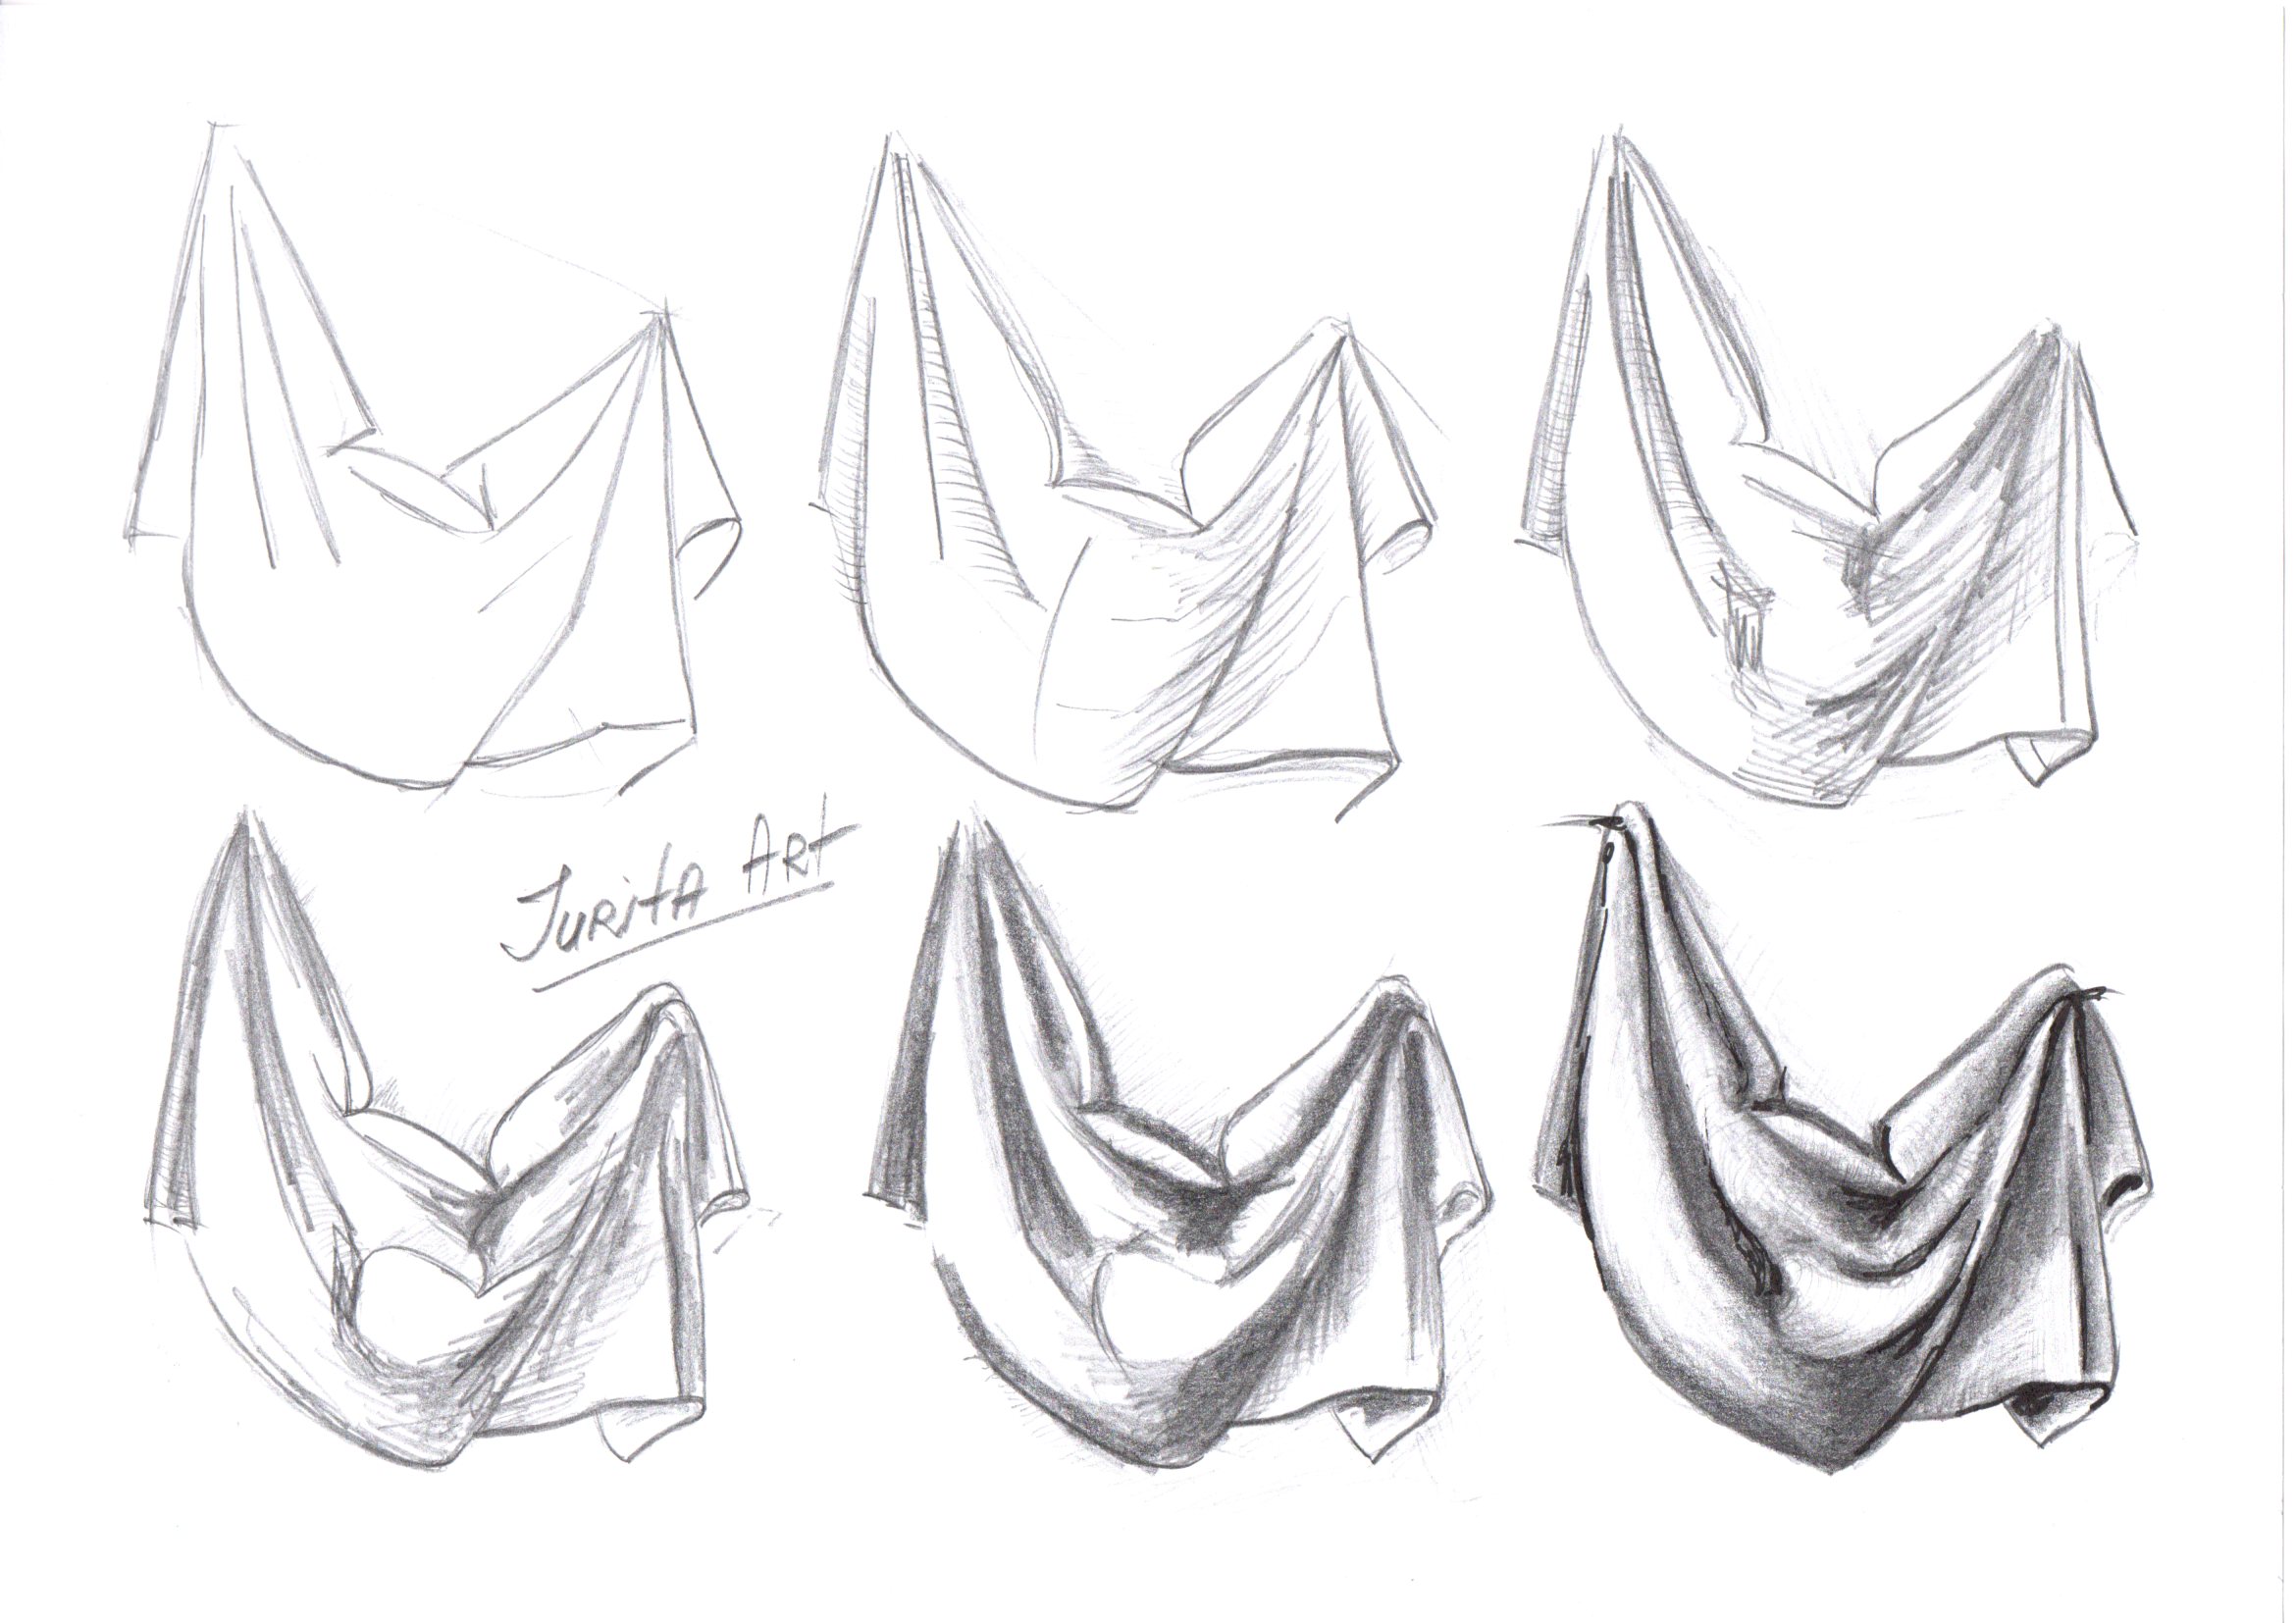
Hanging fabric is usually loose and has a flowing appearance. The stretched tissue forms long lines, usually with a fulcrum. The squeezed tissues knit together, creating wrinkled areas.
To convey the folds correctly, I used auxiliary lines, with which I marked their shape in some places I did not understand.
After they are outlined, we begin to give them volume. We put the strokes in the form.
To begin with, along the edge of the folds, go through the pencil with one shadow color, select the darkest parts of the shadows.
When the crease is defined, we begin to give it falling shadows in the foreground, these are the darkest areas in the picture. They shouldn’t be too dark so you can come back to them later and make them darker.
I made the front folds more contrasting and detailed. The background folds should be less contrasting.
We achieve a smooth transition from light to shadow.
When this stage of work is completed, we give the contour clarity and add pins with which the fabric was attached to the wall.
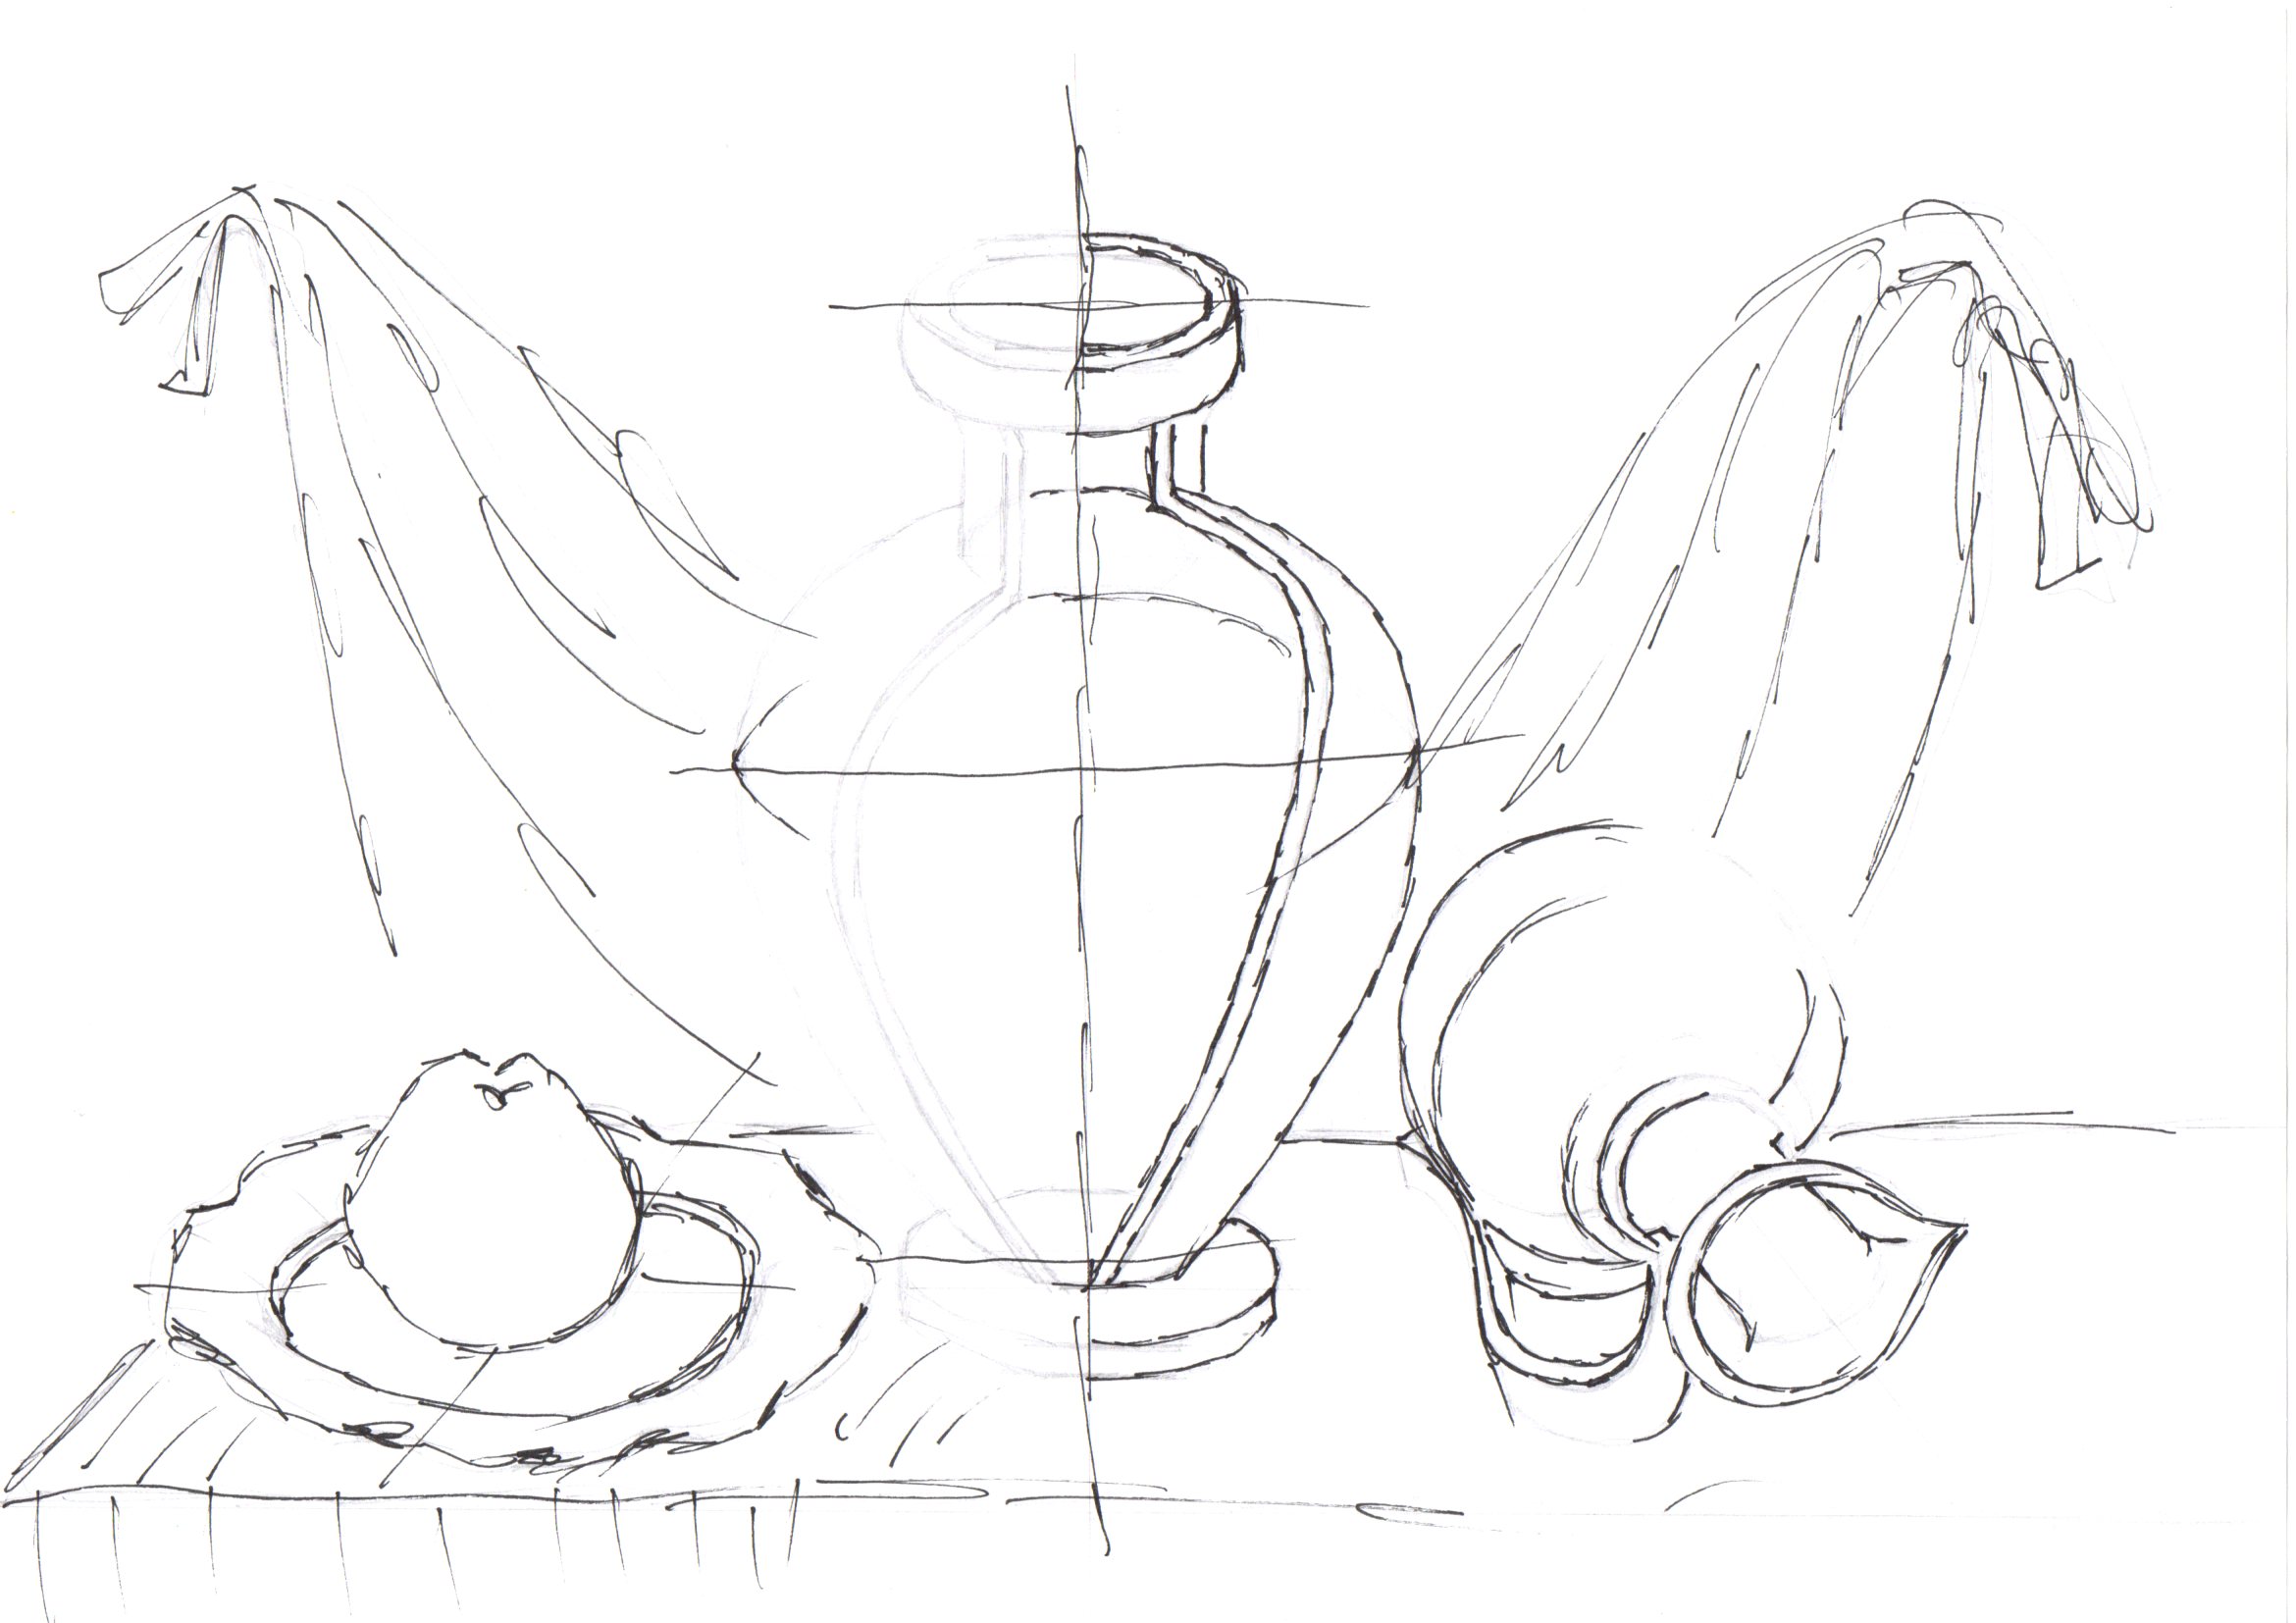
4.4 Practical exercise: Drawing a jug (pencil)
The general spatial position of the jug on the sheet is determined:
1. The general spatial position of the jug on the sheet is determined, the middle line is drawn, the height of the jug, the height of the neck and the widest place in the lower part of the jug are marked with horizontal strokes. The width of the throat, the widest part of the vessel and the bottom are noted. The connection of these points makes it possible to obtain the overall contour of the jug.
2. Drawing of ovals that convey the perspective contraction of the round parts of the jug (throat, middle part, bottom). The boundaries of light and shadow are defined.
3. Light-tone modeling of the form. The strokes are superimposed according to the shape of the subject.
4. The last stage – further black-and-white elaboration of the shape of the jug, the transfer of volume. It is necessary to show on the smooth surface of the vessel the lightest places (highlights), a gradual transition from light to shadow (mid-tone), the darkest places (shadow), lighter places in the shadow (reflexes) that arise from reflected light. The details are worked out, the form is generalized, the construction lines are gradually erased and shaded. The jug drawing is complete.
Thank you!
Contact artist Jurita AGSA:
www.LadyJuGallery.co.uk
www.JuritaArt.com/
email: jukaconsulting@gmail.com